
As spring encourages homeowners to refresh and renew their outdoor living spaces, one of the most effective ways to enhance these areas is through concrete stamping. Stamped concrete provides a versatile, durable solution that mimics the look of high-end materials like stone, brick, and wood—but at a fraction of the cost. For contractors, stamped concrete offers a highly attractive service to offer clients, with the potential to transform ordinary concrete into stunning, functional surfaces.
With the growing demand for outdoor renovations, particularly in residential areas, this spring is the perfect time for contractors to showcase their expertise in stamped concrete. This article breaks down the concrete stamping process—from preparation to finishing touches—and includes some expert tips for elevating residential areas with stamped concrete projects.
Why Choose Stamped Concrete?

- Cost-Effectiveness – Stamped concrete offers the same aesthetic appeal as more expensive materials, such as natural stone, brick, or wood—but at a significantly lower cost. For homeowners seeking high-end looks on a budget, it provides the ideal solution.
- Durability & Longevity – Once properly installed, stamped concrete is incredibly durable and requires minimal maintenance. Its solid structure can withstand the elements, making it ideal for areas exposed to foot traffic or weather conditions like patios, driveways, and walkways.
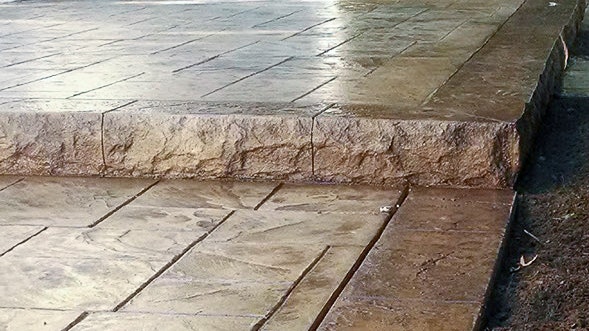
- Versatility in Design – Concrete stamping offers virtually limitless design possibilities. Homeowners can choose from an array of patterns, textures, and colors to match their home’s exterior, from replicating the look of slate or flagstone to the appearance of wood planks.
- Low Maintenance – Unlike wood (which can warp) or stone (which can crack), stamped concrete requires very little upkeep. Regular cleaning and periodic resealing are enough to preserve its beauty and functionality, making it a hassle-free option for homeowners.
- Increased Property Value – The enhanced curb appeal that comes with a beautifully stamped concrete driveway, walkway, or patio can significantly increase a home’s value. Homebuyers often appreciate well-maintained outdoor spaces that look stylish and are built to last.
With all of these benefits in mind, contractors have a real opportunity to stand out as experts in a high-demand field by offering clients a lasting and cost-effective way to transform their outdoor spaces.
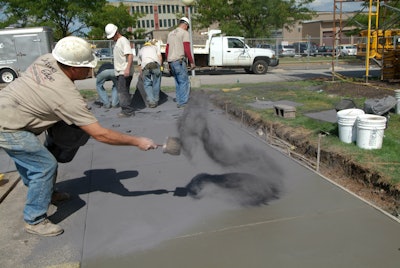
Step 1: The Importance of Preparation
Preparation is the foundation of any stamped concrete project. Without a solid groundwork, even the most meticulously executed stamping will not achieve the desired results. The first step is assessing the site, which includes factors such as soil stability, drainage, and weather conditions. Proper evaluation ensures that the stamped surface will be both aesthetically appealing and durable over time.
The subgrade, or underlying surface, must be properly compacted and leveled to support the slab. A stable subgrade reduces the likelihood of shifting or cracking, which is critical for the long-term integrity of the stamped concrete. The subgrade should be compacted to a uniform level, with any soft spots being addressed before proceeding.
Equally important is selecting the right concrete mix. A mix with a moderate slump, typically around 4-5 in., strikes the right balance between workability and structural integrity. Concrete that is too fluid can be difficult to work with and may not hold the desired texture, while a mix that is too stiff can lead to cracks and poor imprinting.
Step 2: Equipping Yourself with the Right Tools
 The Euclid Chemical Company
Another essential tool is the release agent, which prevents the stamps from sticking to the concrete and helps achieve a crisp, detailed pattern. Release agents also add a layer of color and texture to the surface. Contractors can choose between liquid or powdered release agents, but regardless of the form, it is essential to apply them evenly and consistently to avoid uneven coloring.
Additional tools such as edgers, chisels, and tampers are also necessary for finishing the stamped concrete project. Edgers and chisels help refine the borders, while tampers apply uniform pressure during the stamping process, ensuring an even depth across the surface.
Step 3: Mastering the Timing for Concrete Stamping
The timing of stamping is instrumental to achieving perfect results. Concrete must be in the right phase of its curing process to accept an impression. If you stamp too early, the pattern will not set properly and could distort, while waiting too long could lead to a surface that resists imprints altogether. To avoid these issues, contractors must pay close attention to the surface’s firmness and pliability. Testing the concrete’s readiness through touch ensures that the slab is at the optimal stage for stamping.
Weather conditions are another factor that influences the timing of stamping. In hot weather, concrete sets faster, and additional retarders may be necessary to slow down the curing process. Conversely, in colder temperatures, accelerators may be required to maintain the desired workability. Contractors should also work in manageable sections to maintain consistent control over timing and quality. This approach allows workers to move more efficiently and ensures uniformity across the entire slab. 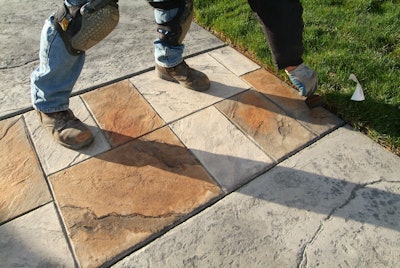 The Euclid Chemical Company
Step 4: Customizing Your Stamped Concrete Design
Stamped concrete provides almost limitless opportunities for customization, allowing homeowners to mimic the appearance of premium materials such as slate, stone, wood, and brick. For contractors, this versatility presents the opportunity to cater to a wide variety of design preferences.
When designing stamped concrete, consider incorporating multiple colors to mimic the natural variation found in real stone, wood or brick. This layering effect can add depth and complexity to the design. Integral colors, applied directly into the mix, can be combined with surface-applied stains or dry-shake hardeners to create a more dynamic and sophisticated look.
It’s also important to consider how the stamped concrete integrates with the overall aesthetics of the surrounding area. The colors and patterns chosen should complement the home’s architecture and the surrounding landscaping to achieve a cohesive appearance. Adding borders, medallions or custom patterns can further personalize the design, enhancing the property’s curb appeal.
Step 5: The Art & Technique of Concrete Stamping
Stamped concrete is as much an art as it is a technical process. Achieving consistent, high-quality results requires both precision and a team effort. The process should begin at one corner of the slab and proceed methodically to avoid stepping on freshly imprinted sections. Overlapping stamps slightly ensures there are no gaps or inconsistencies in the pattern. Ensuring the stamps are properly aligned throughout the process will also eliminate unwanted seams or misalignments in the design.
Be sure to apply steady and even pressure across the stamps. Contractors should utilize tampers to ensure a uniform depth across the entire surface. Uneven impressions or imperfections should be addressed immediately to prevent them from becoming permanent. Tools like texture skins or detail chisels can be used to smooth out rough spots or perfect certain areas, improving the overall look. 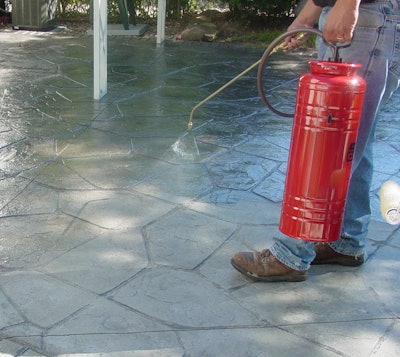 The Euclid Chemical Company
Step 6: Don’t Forget the Finishing Touches
Once the stamping process is complete, the finishing touches make all the difference. First, the concrete must be cleaned to remove the release agent. While using a pressure washer can be effective for this task, contractors should exercise caution to avoid damaging the imprints. A gentle rinse is often sufficient to remove excess residue without disturbing the fine details of the pattern.
The final step in the stamping process is applying a sealer. Sealers protect the stamped surface from stains, moisture, and wear, and they bring out the vibrancy of the colors. For surfaces exposed to foot traffic, such as patios and walkways, contractors should use a slip-resistant sealer to enhance safety. Regular resealing ensures the surface maintains its appearance and durability over time, allowing homeowners to enjoy their investment for many years.
View the original article and our Inspiration here
Leave a Reply