
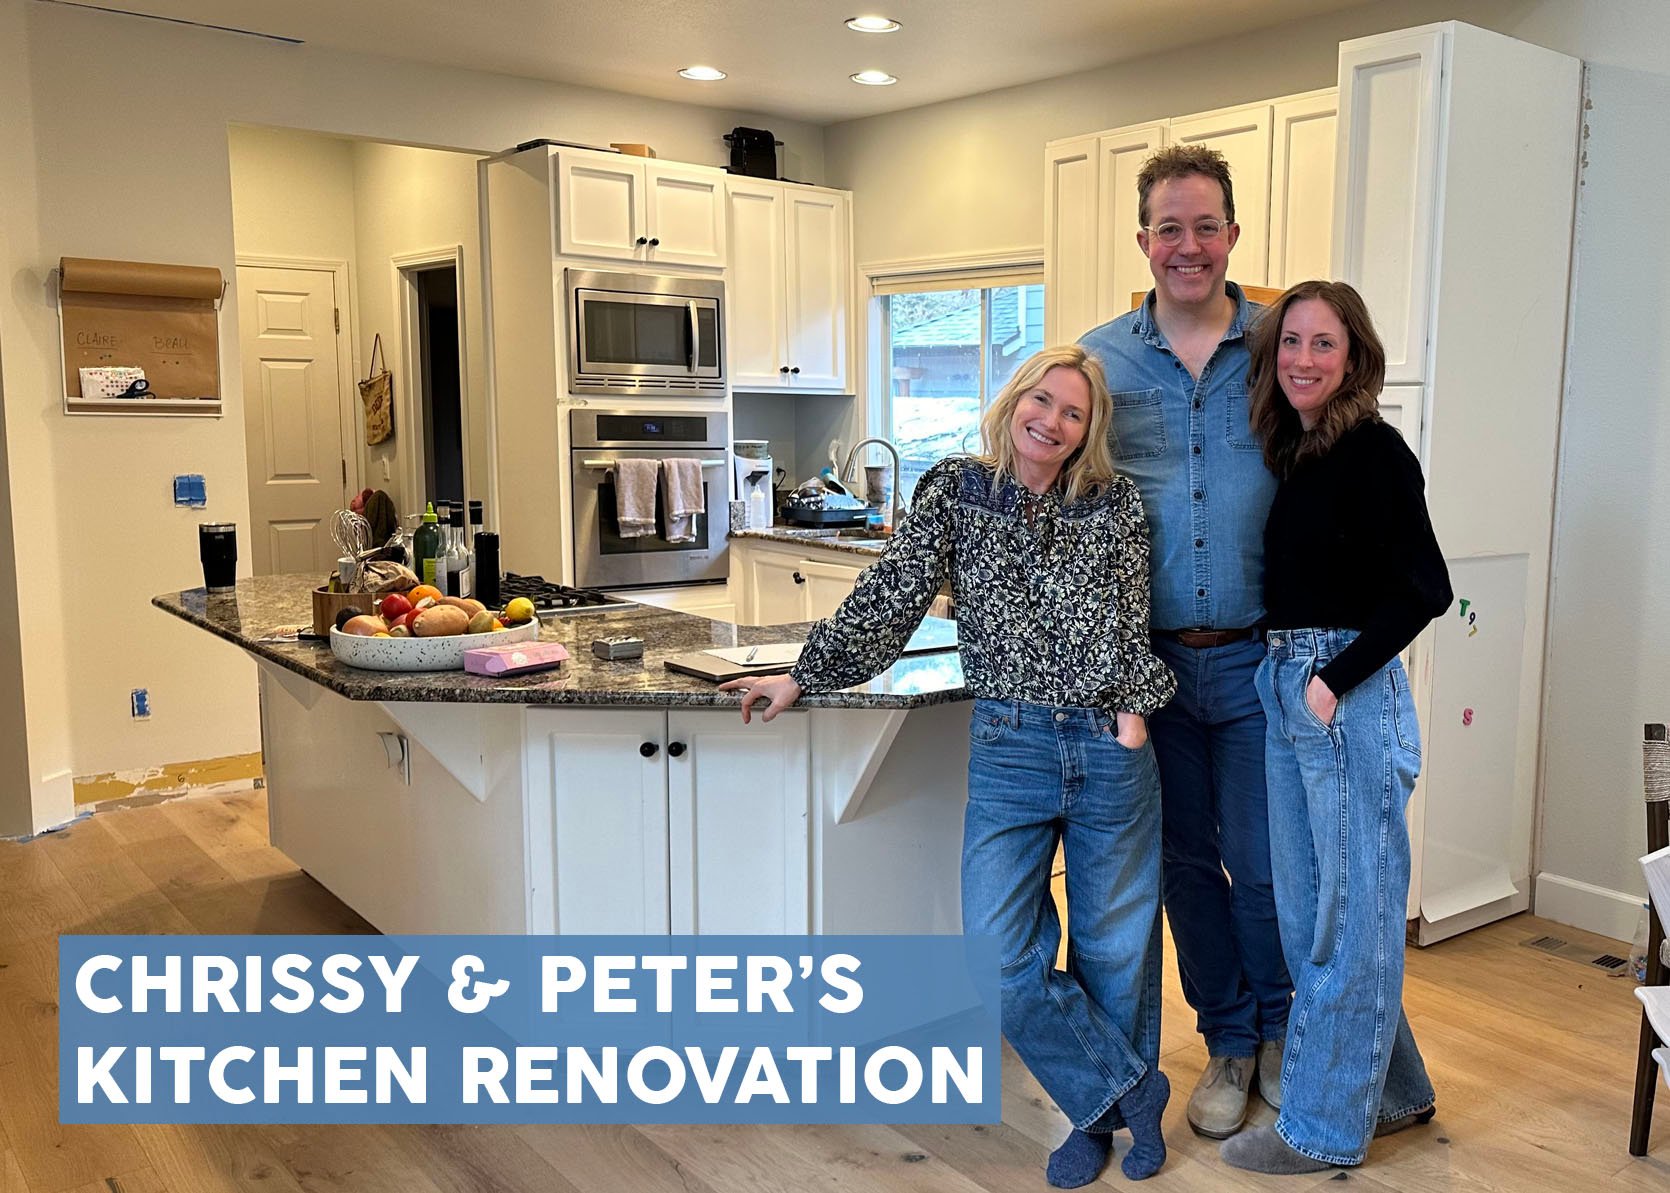
Oh boy, this is fun. I love inserting myself into other people’s problems (usually when asked) so this whole “help someone else design their house” thing is already making my dopamine spike. After sifting through countless submissions (sooo many good ones–thank you to all who applied!), battling weeks of email hacking snafus, and balancing our super stacked schedule, we FINALLY found our match. You can read about this sweet couple here!
To refresh your memory Chrissy and Peter, our first participants in the Renovation Coach series, have 3 kids under the age of 3, really good taste, and enough experience with remodeling to not hire a contractor. And yet, like all of us, doing it alone feels daunting and scary (because it simply is the nature of the beast).
About The House
The house was built in the 90s and has an addition and some awkward angles and finishes for sure. But the neighborhood is great and the lot is HUGE. They want to change a lot about the house – adding a primary bedroom, moving the powder bath, adding a mudroom, moving the washer/dryer upstairs, and redoing the kitchen (maybe more, but that’s what came out of the 2-hour initial session). For our purposes, we are talking kitchen, but it was so good to know what else they were thinking – how long will this string be??
For total visual context of the space before we get into the ins and out of this kitchen, here is a video of the space! (just wait for the ads to play:))
Back To The Kitchen (Pre-Move-In)
Here’s how it looked when they first moved in. From the drop ceiling to the weirdly shaped island to the unfortunate, immovable structural elements, the kitchen was not their fantasy – both in function and style. Their biggest complaint has been the lack of storage but truly it all needs updating–countertops, cabinets, appliances, flooring, you name it. The flow is a bit weird overall and they’re open to reimagining the space entirely. Oh, and the cabinets are falling apart. “BUILDER-GRADE” (she shakes her fists at the sky).
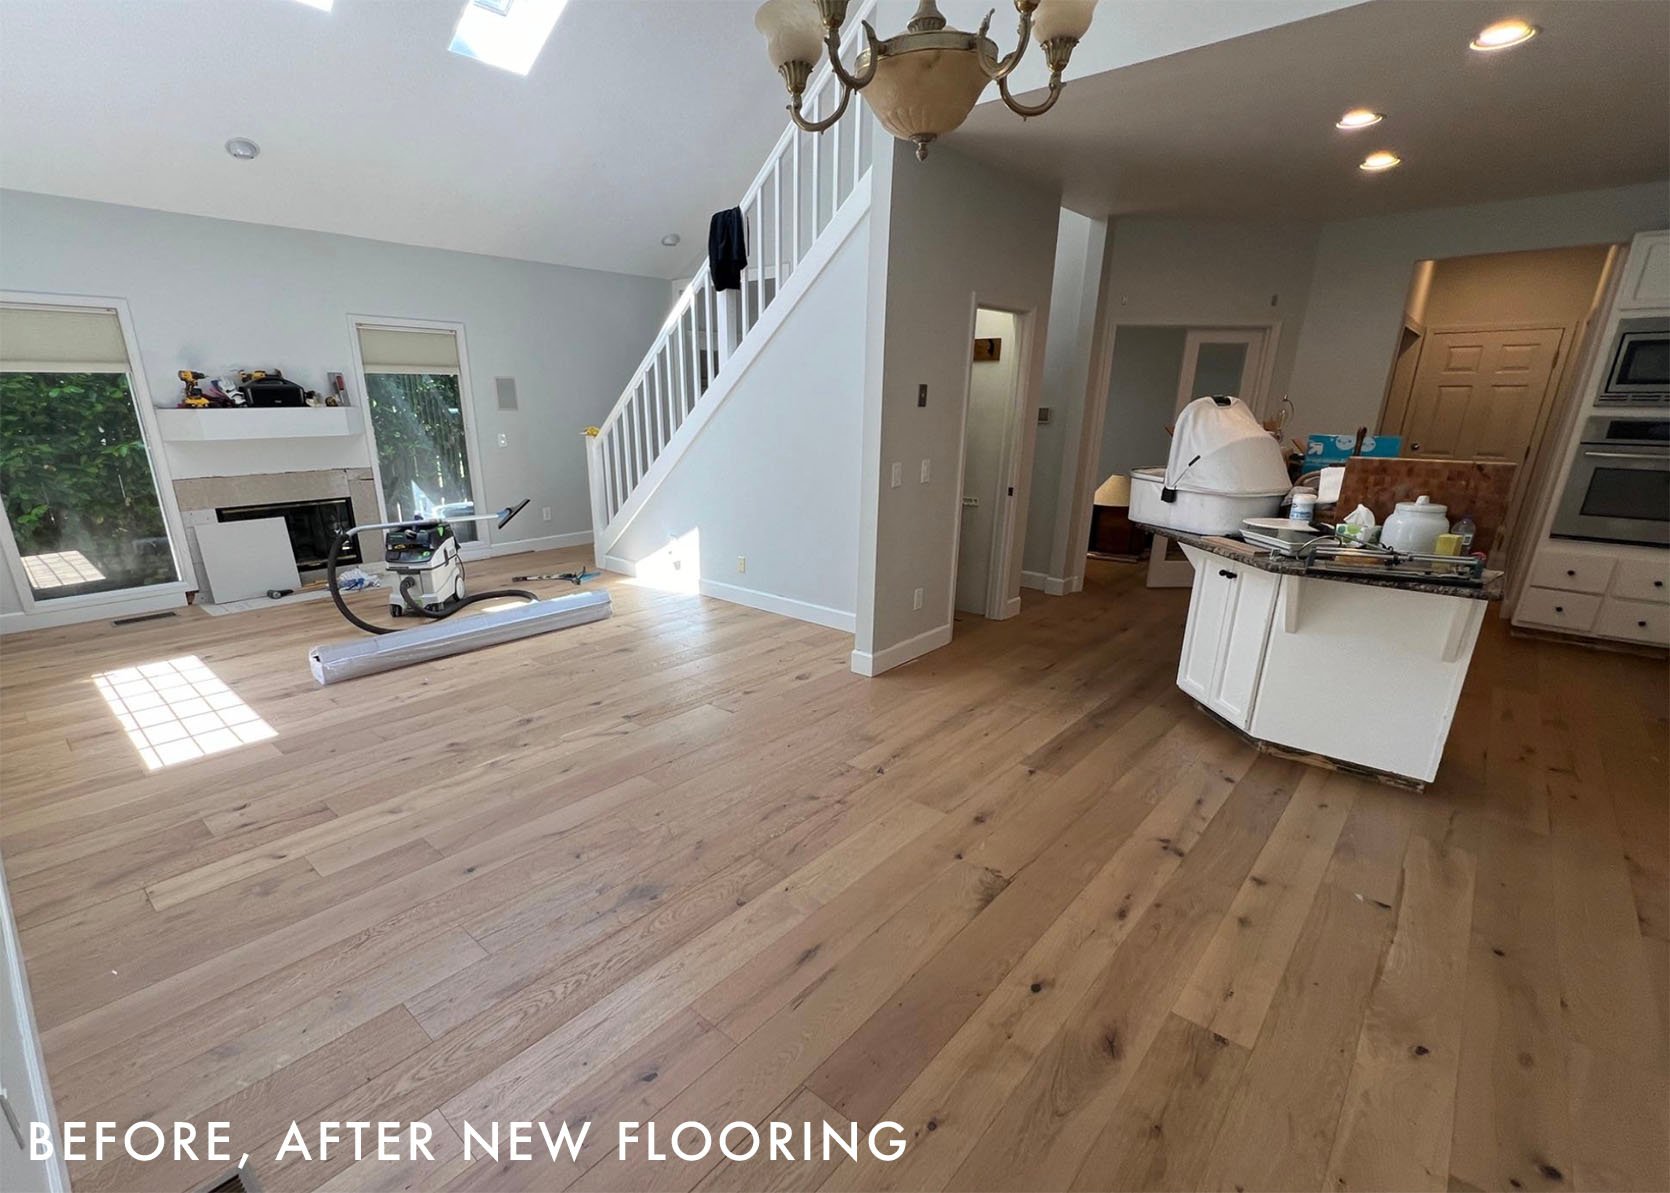
They’ve already made some killer changes, starting with the floor. They opted for this beautiful wide plank wood flooring, getting rid of the checkerboard, which only enhanced the datedness of the kitchen, but also opened up options. By changing the direction of the wood floors it also really helped to better connect the kitchen to the living areas.
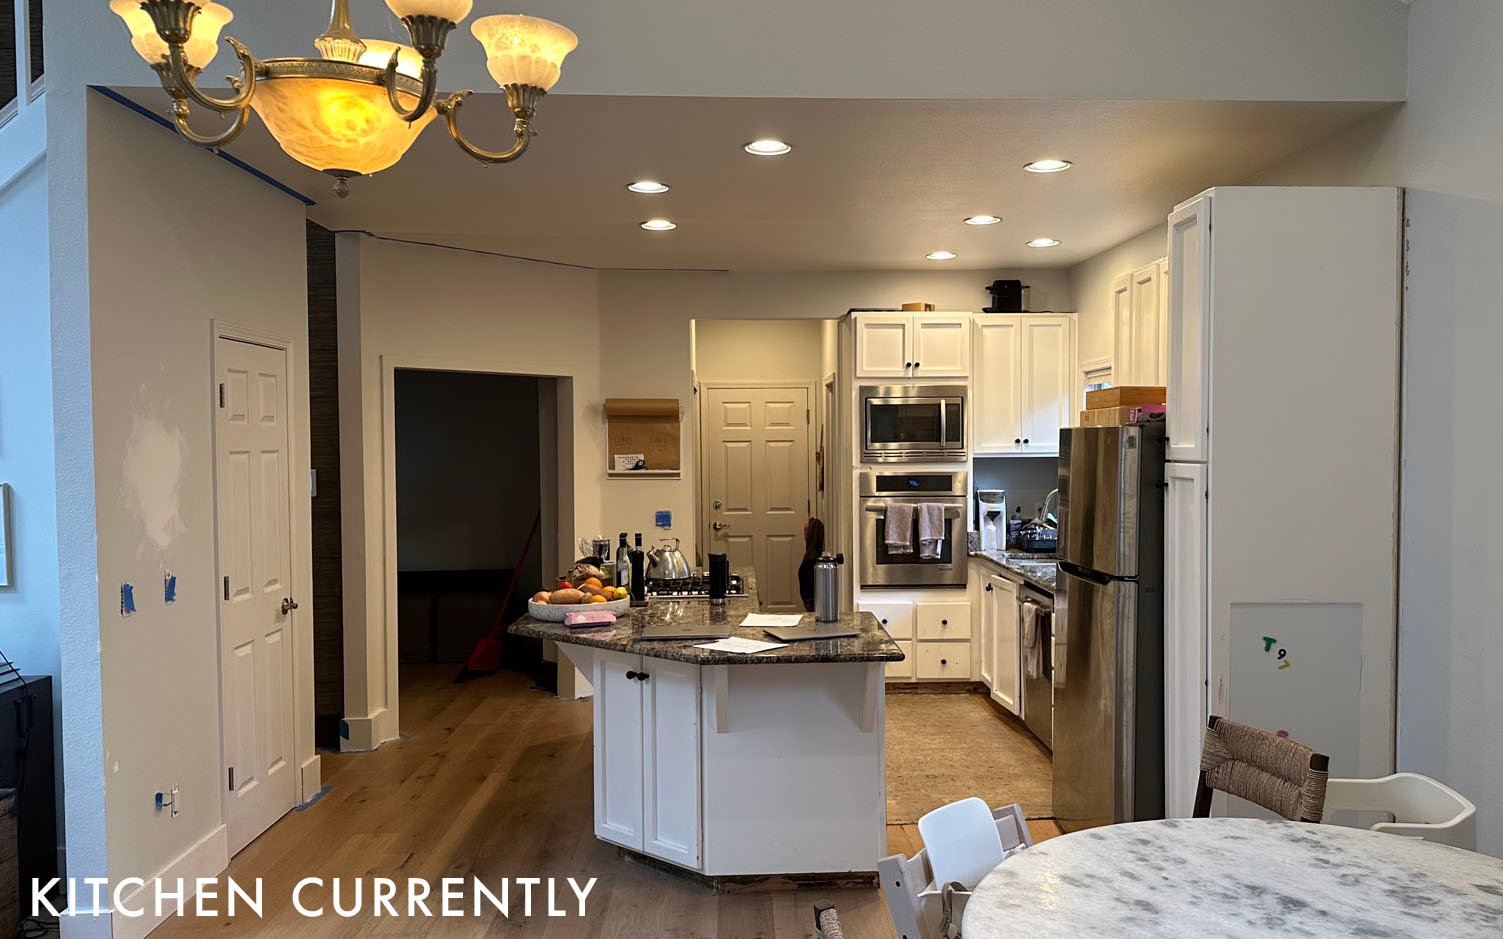
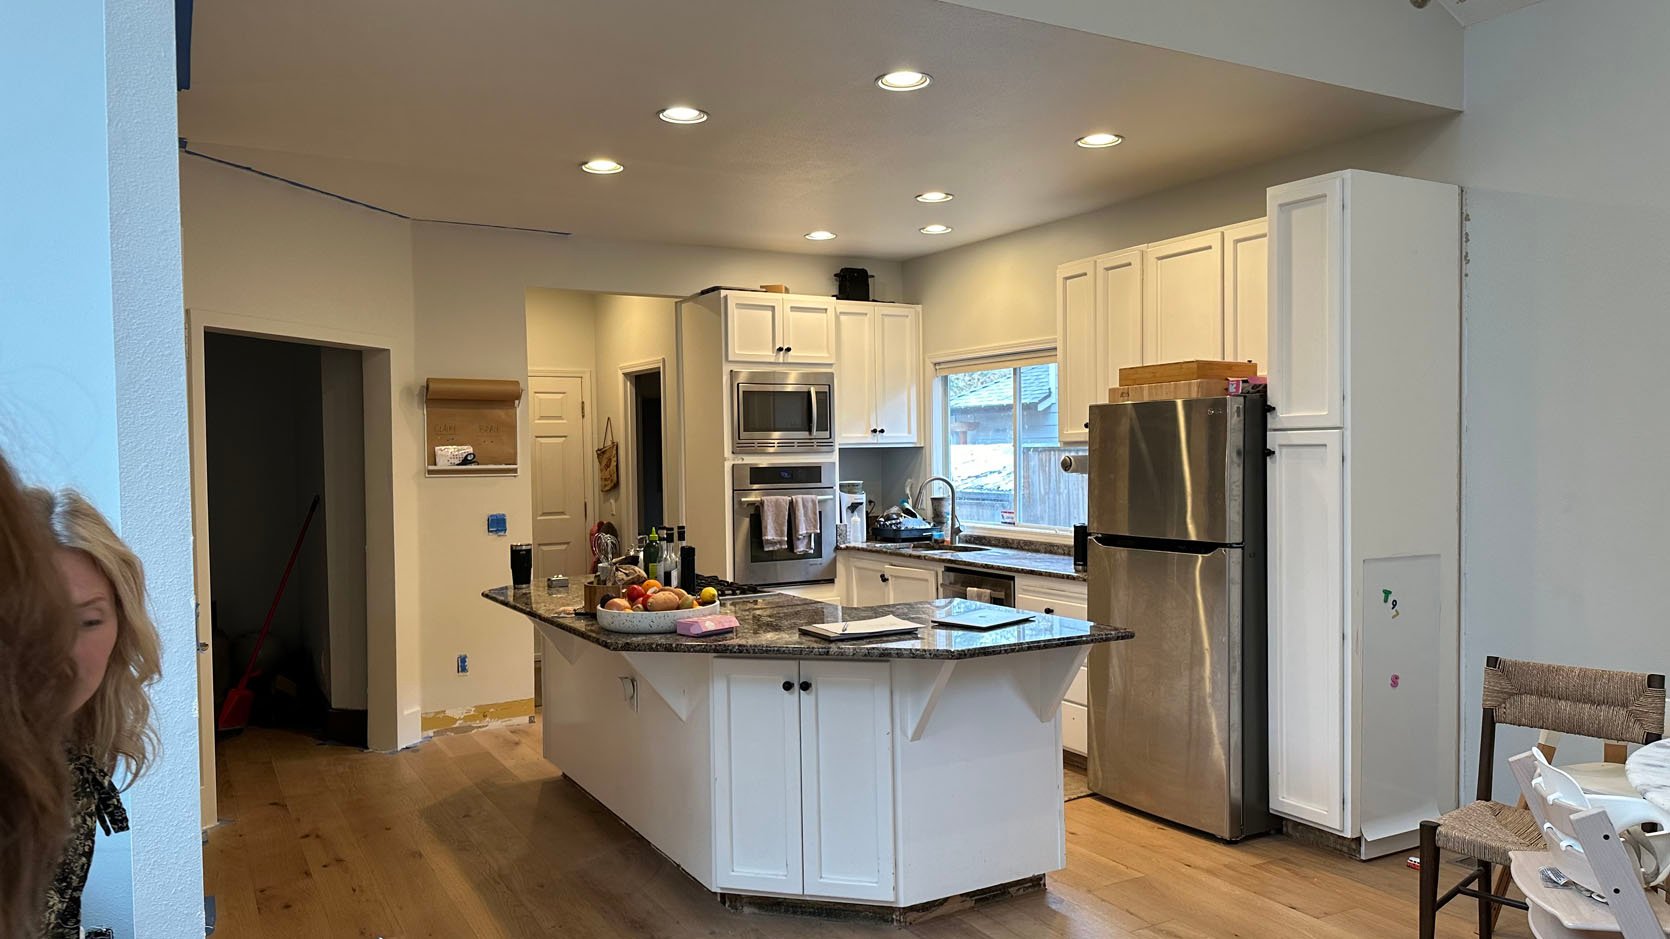
Here is what their kitchen looked like the day we stopped by to check it out. As you can see, they are mid-project and have been agonizing over the best solution for this space to keep moving forward. They’ve explored a number of layouts and have yet to land on the right one (her keynote collages look like mine – abundant and messy a la A Beautiful Mind. When we first got there she had a plan and two hours later we totally changed it (for the better, we think).
Chrissy’s First Mockup (Pre-Meeting)
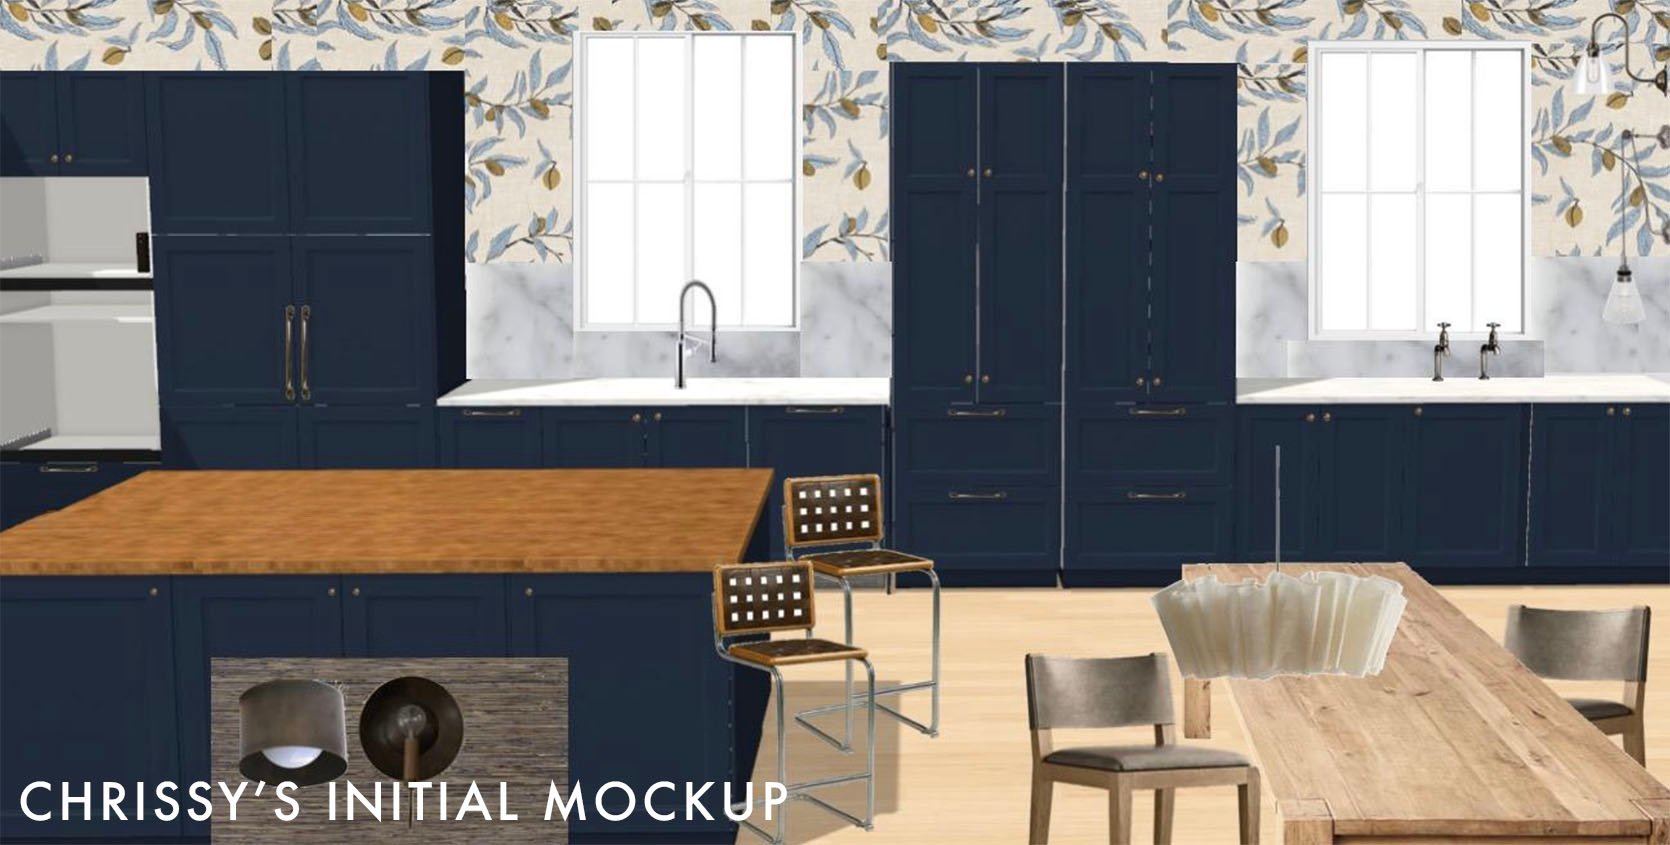
Christy wanted to extend the size of the kitchen into the space next door (which seemed to be initially intended for a dining room). Desperate for storage and a nice big island for cooking and entertaining, they thought that this could be a good solution. I didn’t, TBH, especially because once you get into the space the biggest issue is two different ceiling levels.
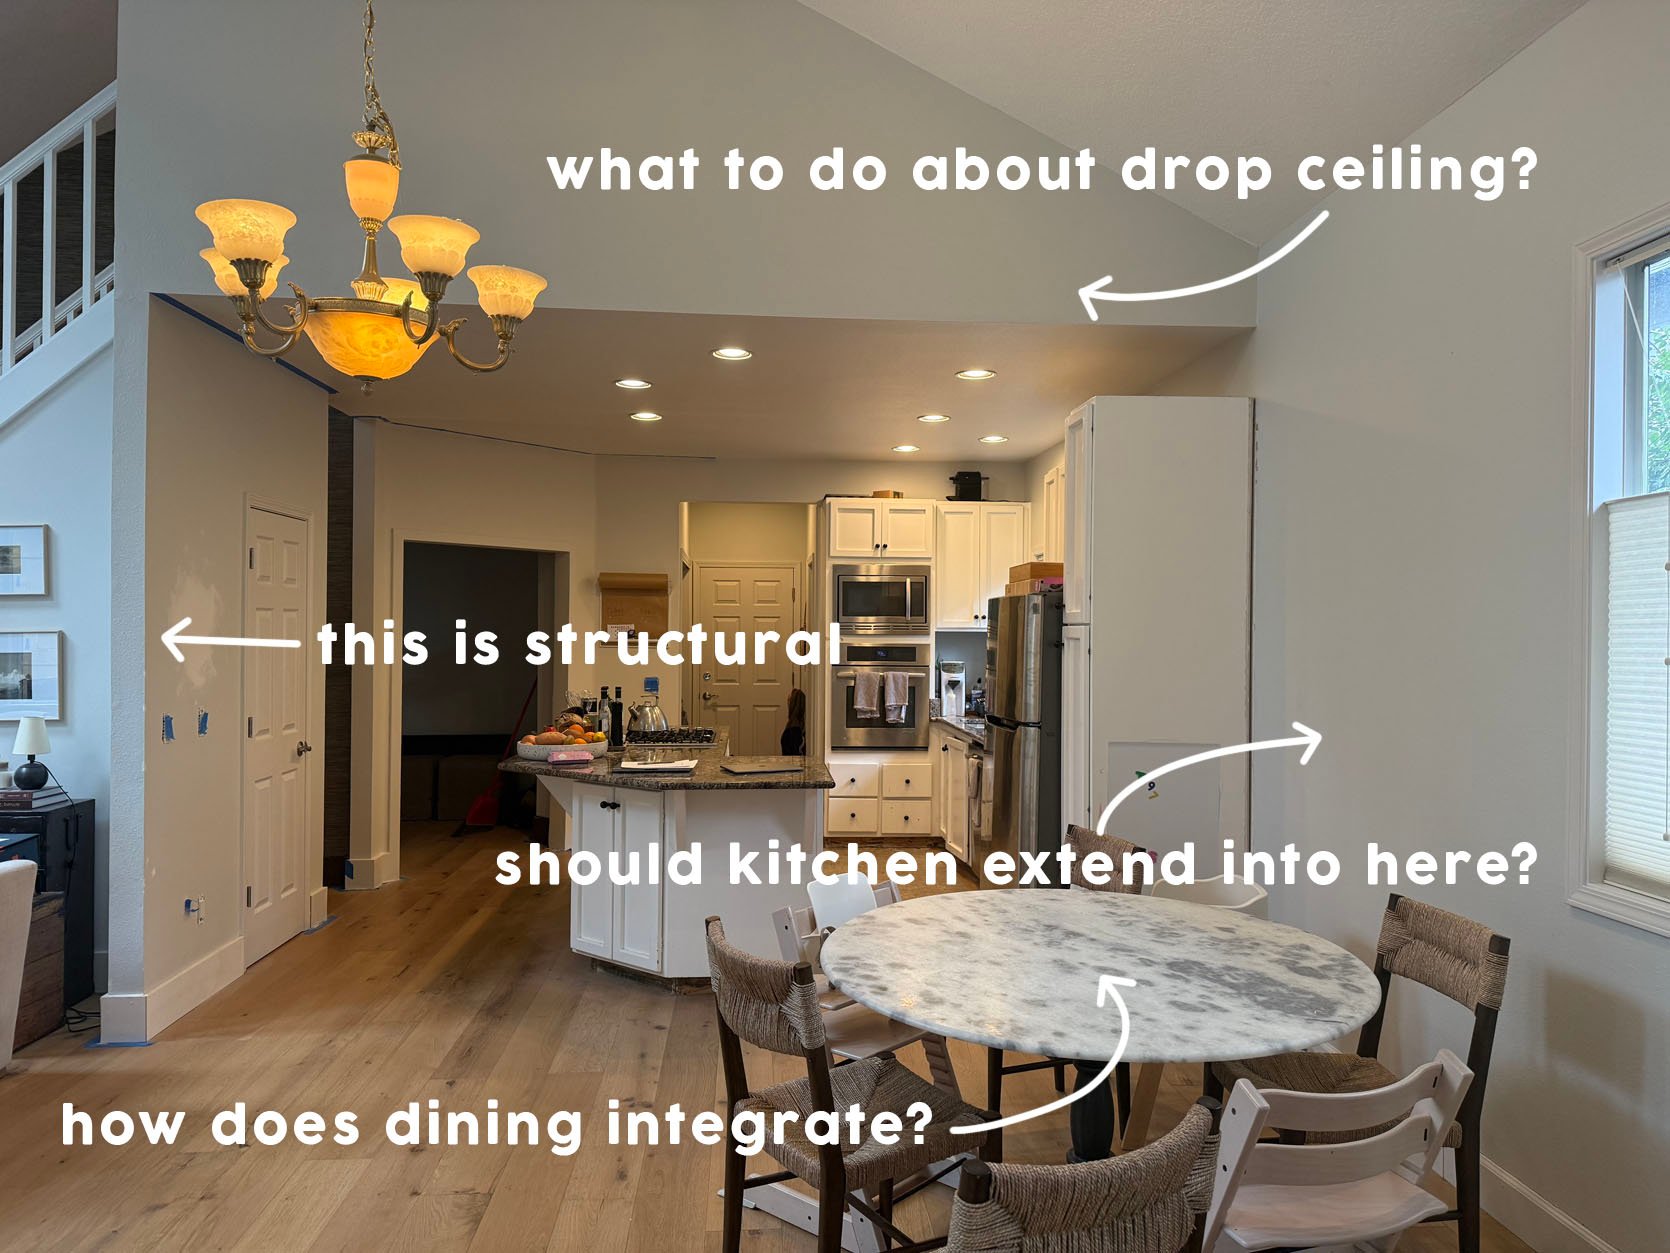
The dropped and vaulted ceiling is really the culprit here. Well, actually it’s just a regular 8ft ceiling in the kitchen zone that feels like a dropped ceiling because the rest of the space is vaulted. But this cross section is definitely structural, holding up part of their kids’ room upstairs, so they have to find a way to work with it.
There were some other issues, as well that they wanted to address.

Speaking of structural, both the wall attached to the stairs and this diagonal corner wall connecting to their current washer/dryer closet, have to stay. In this back area is the entrance from their garage, a tight walk-thru, with laundry on one side (that they want to be moved upstairs) and a teeny tiny powder bath on the other. Ideally, they’d love to find a way to add a mudroom in this area…but one project at a time. My perspective was that all these little moves would end up costing $250k at least and not all of them were worth it. Moving a powder bath 5 feet could cost $25k (could also be less, but you just don’t know) so I advised against it unless they were 100% sure this was their “forever home”.
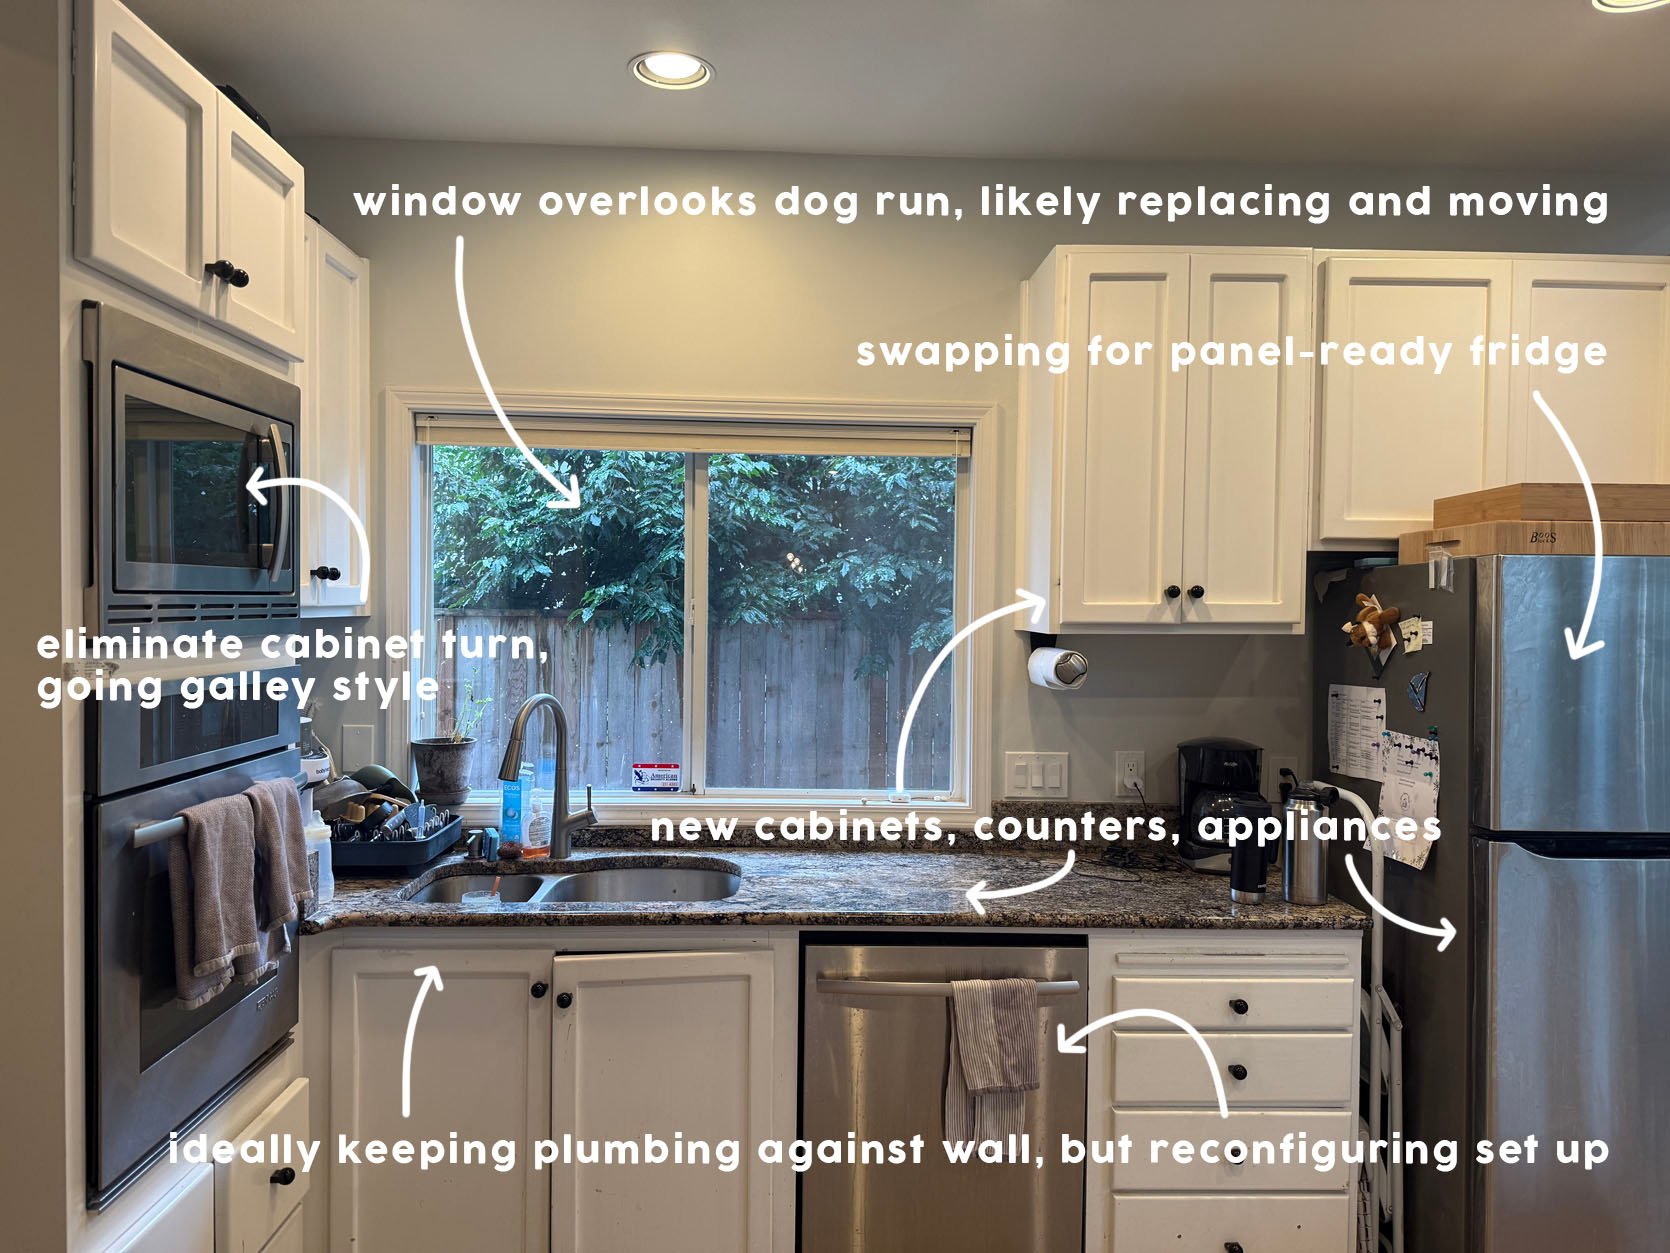
Stepping into the kitchen, this is your main view: a bank of tired cabinets, the sink, the dishwasher, and a view that overlooks the dogs’ potty zone. (Did I mention they have two cute pups?) The whole house actually gets really great light exposure from the many windows in the living room, and Chrissy hasn’t loved looking out into this area. They’ve discussed removing this window entirely (or maybe the one in the dining room) or just shifting it over to make room for their ideal cabinet layout. Regardless, they will put in new windows should they keep them here.
Plumbing will likely stay on this back wall to keep costs and complications down. But they want to shift the sink over, swapping it for a bigger/better one, then flanking it with a panel-ready dishwasher and trash drawer. And of course, all of this means new cabinets, countertops, hardware, appliances, etc. Again, here is their last mood board (which is rapidly changing, per the usual design process).
Chrissy has great taste and design eye – I loved her mockup. None of these elements are final except for the style/color of the cabinetry. The one thing they know for sure is that they love the AXSTAD blue kitchen cabinets from IKEA. The price is right and the look and color really speak to them. Us too. Initially, she wanted to extend the cabinetry all the way across, into the vaulted ceiling dining area, creating a bar zone and prep area with more storage. But she’s struggled with the right combination of cabinets that will align with that ceiling height jump in a visually pleasing way.
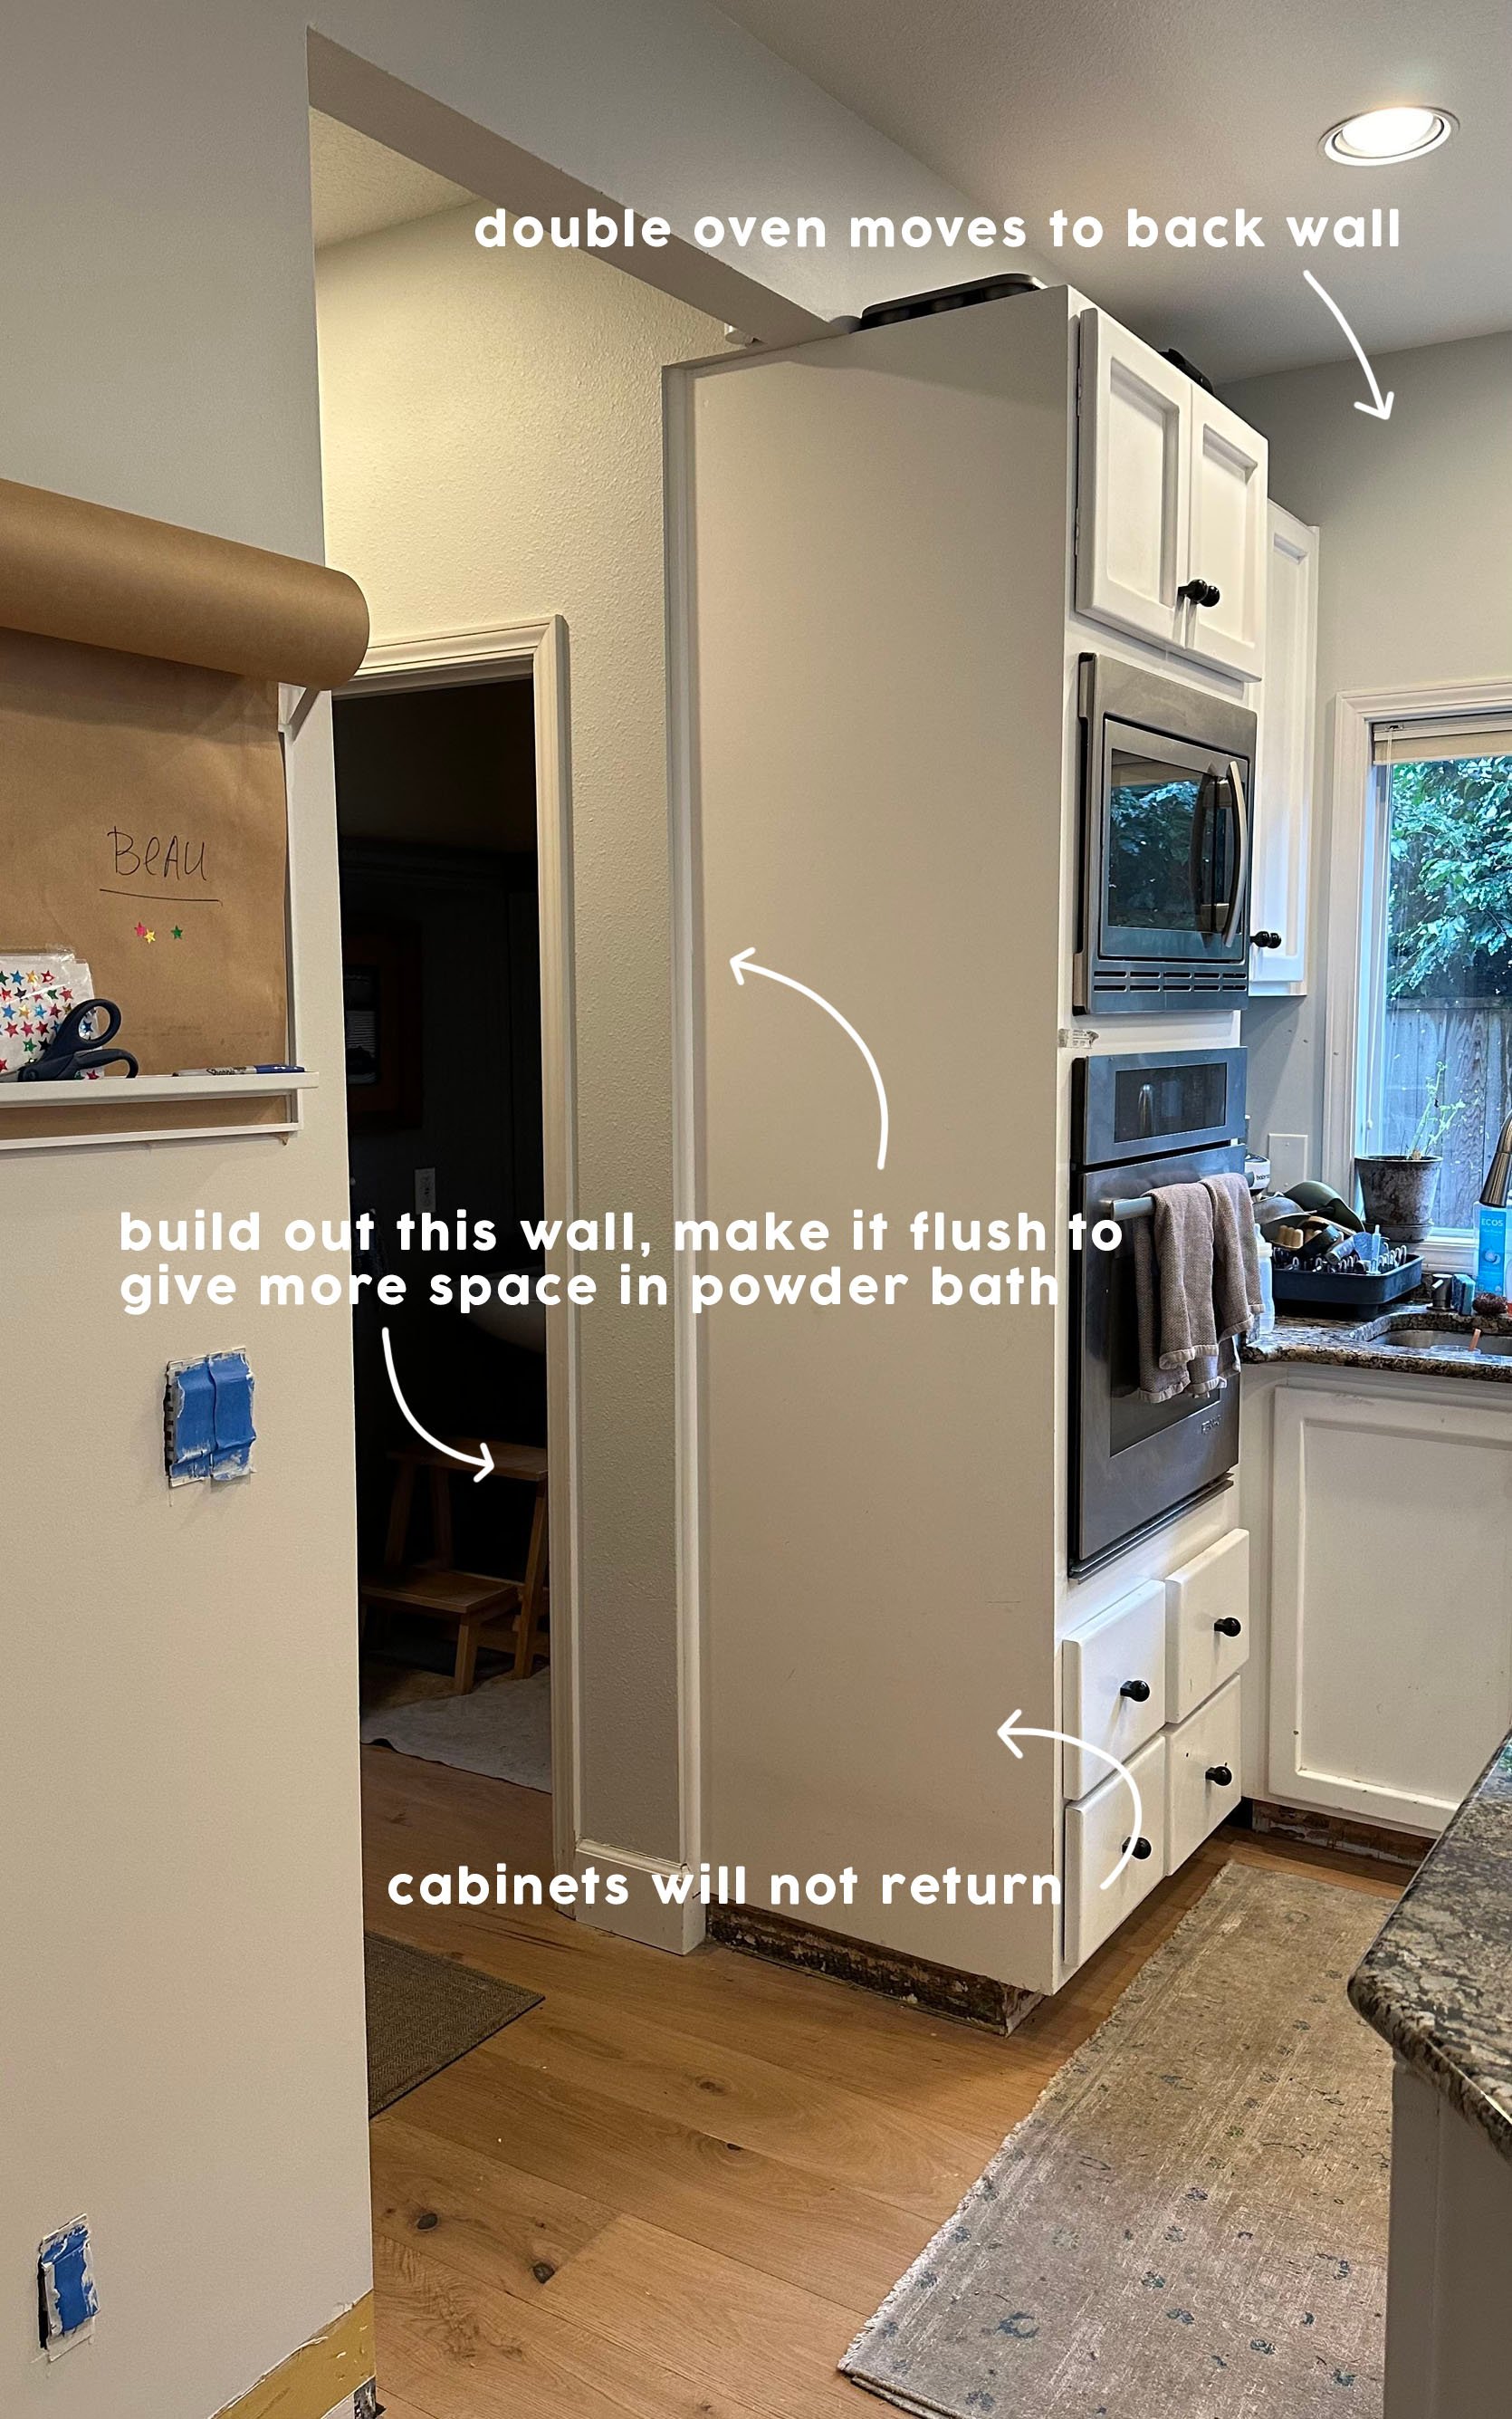
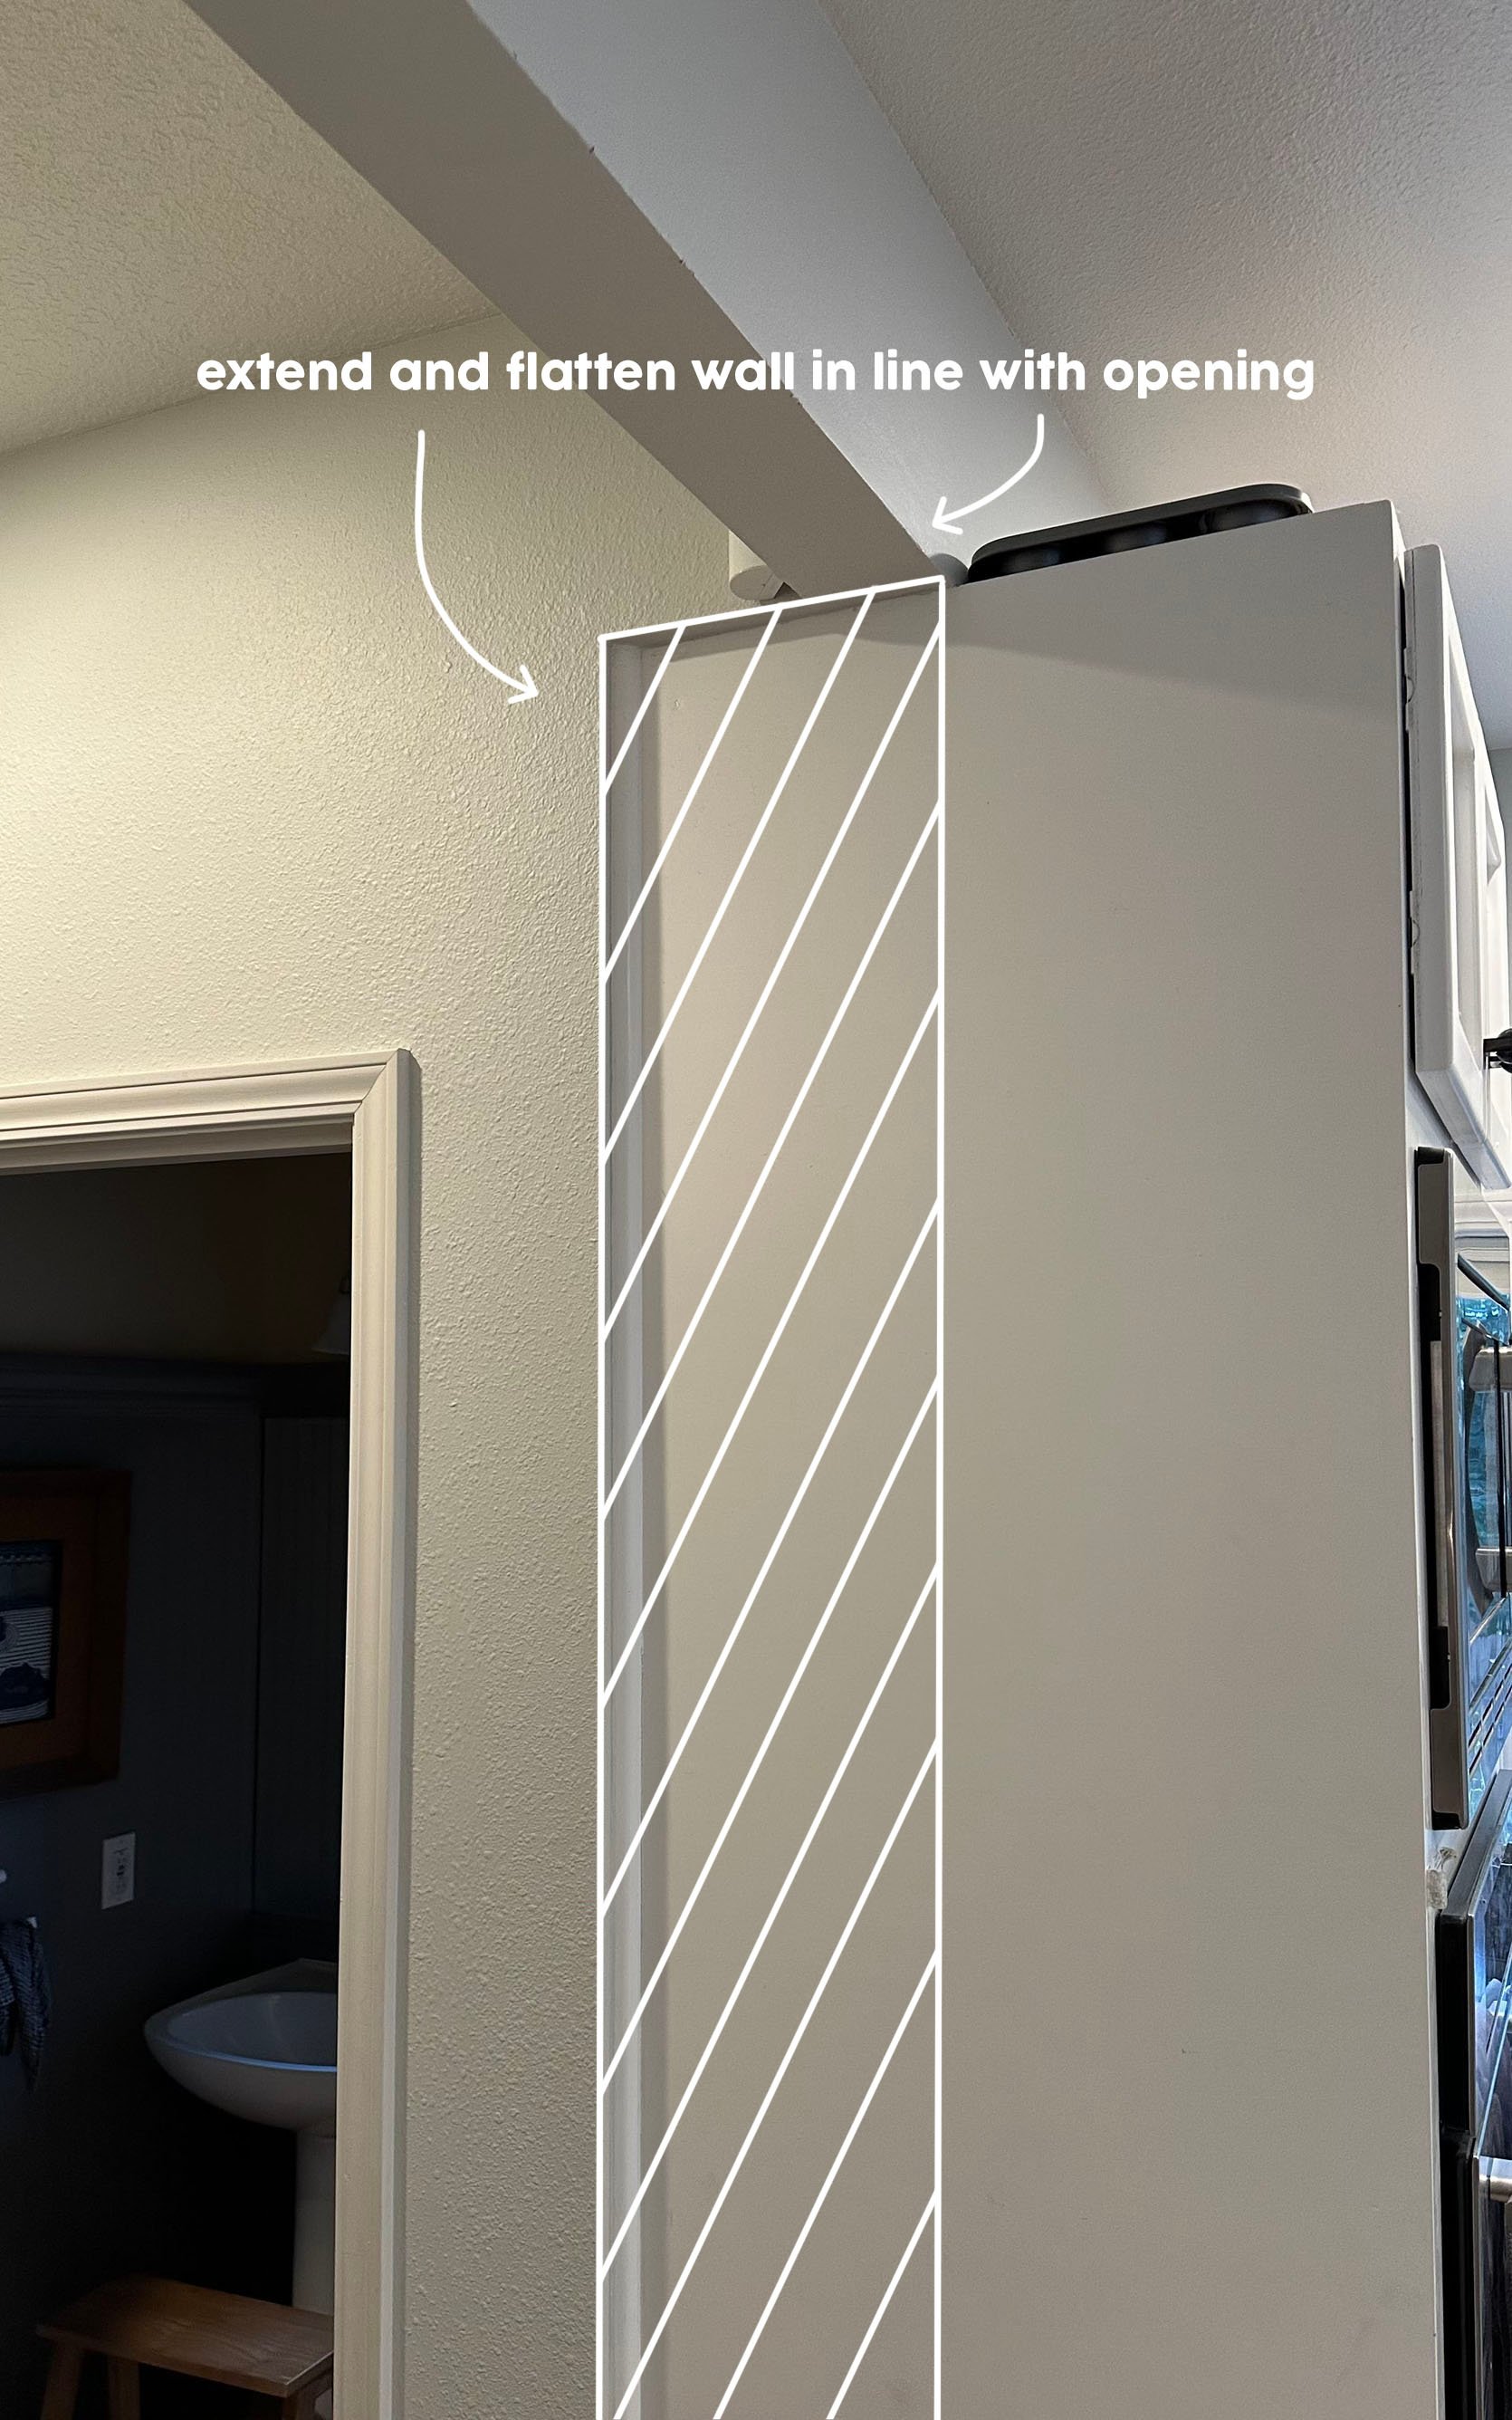
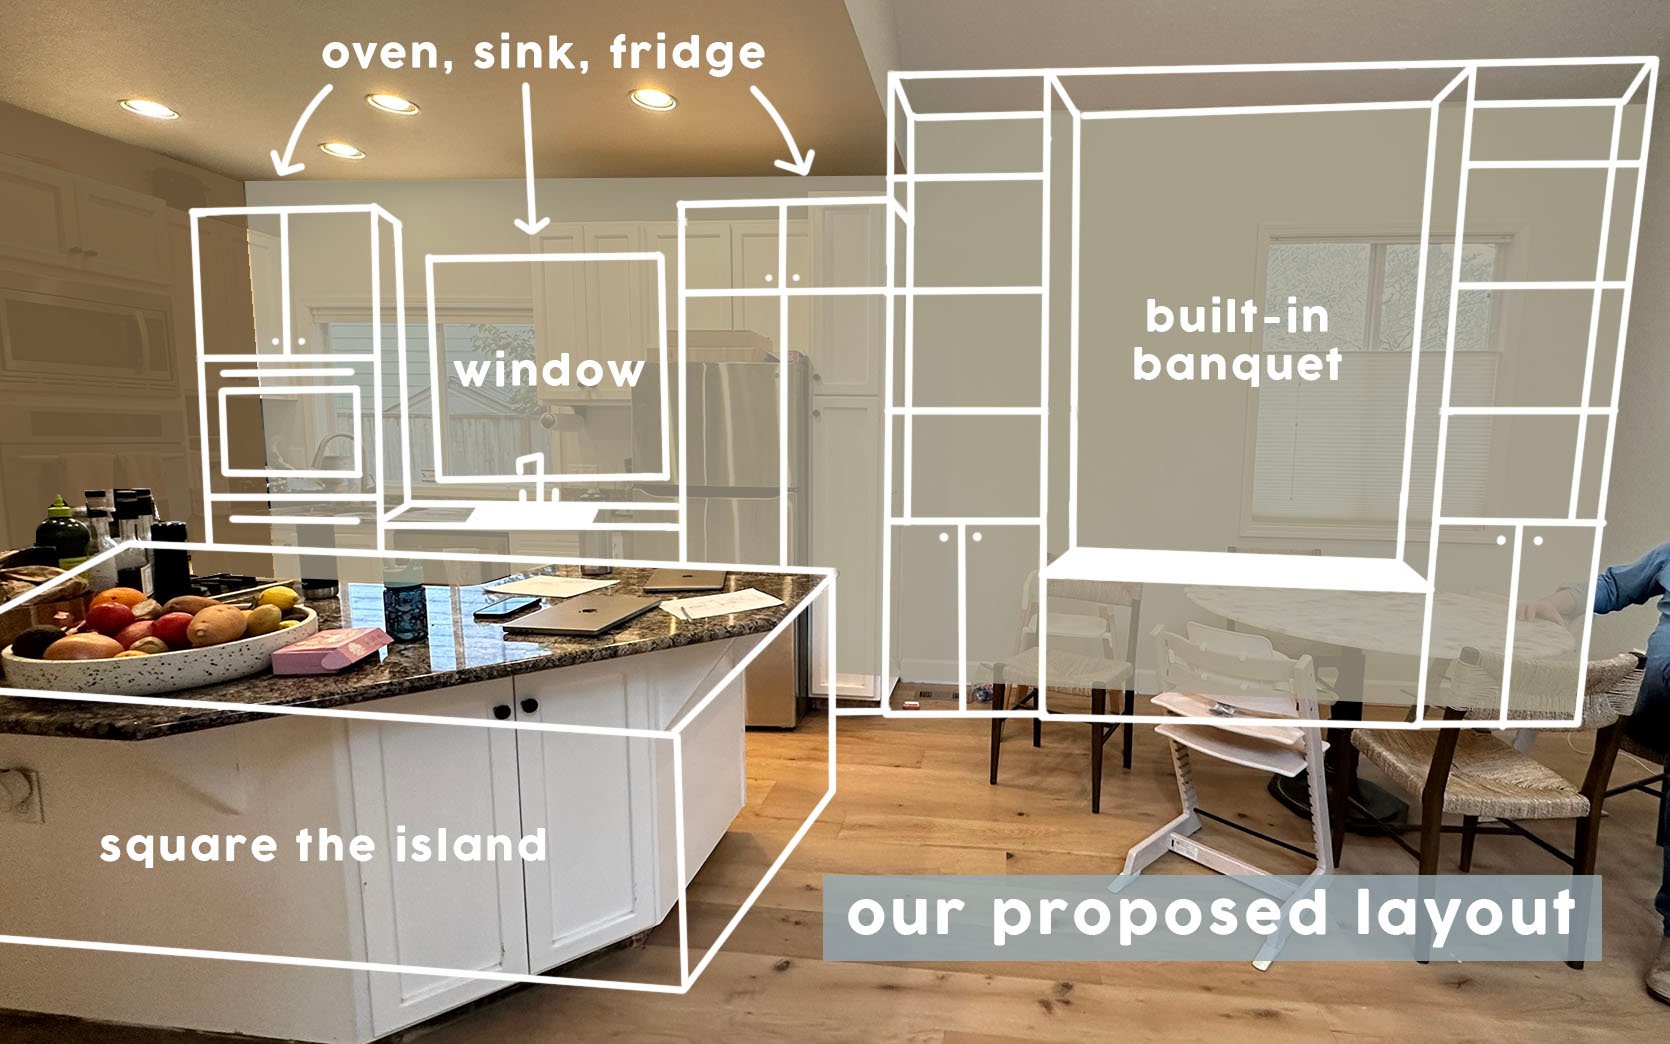
Additionally, they are losing the corner cabinets, instead shifting the oven zone in line with the back wall to create more of a galley-style kitchen. In order to make this work and look right, they will need to address this weird wall situation and plan to bump it out to make it flush with the walkway opening. Doing this will also add about a foot of space to the powder bath on the other side (another project they have plans for, but again, one thing at a time!).
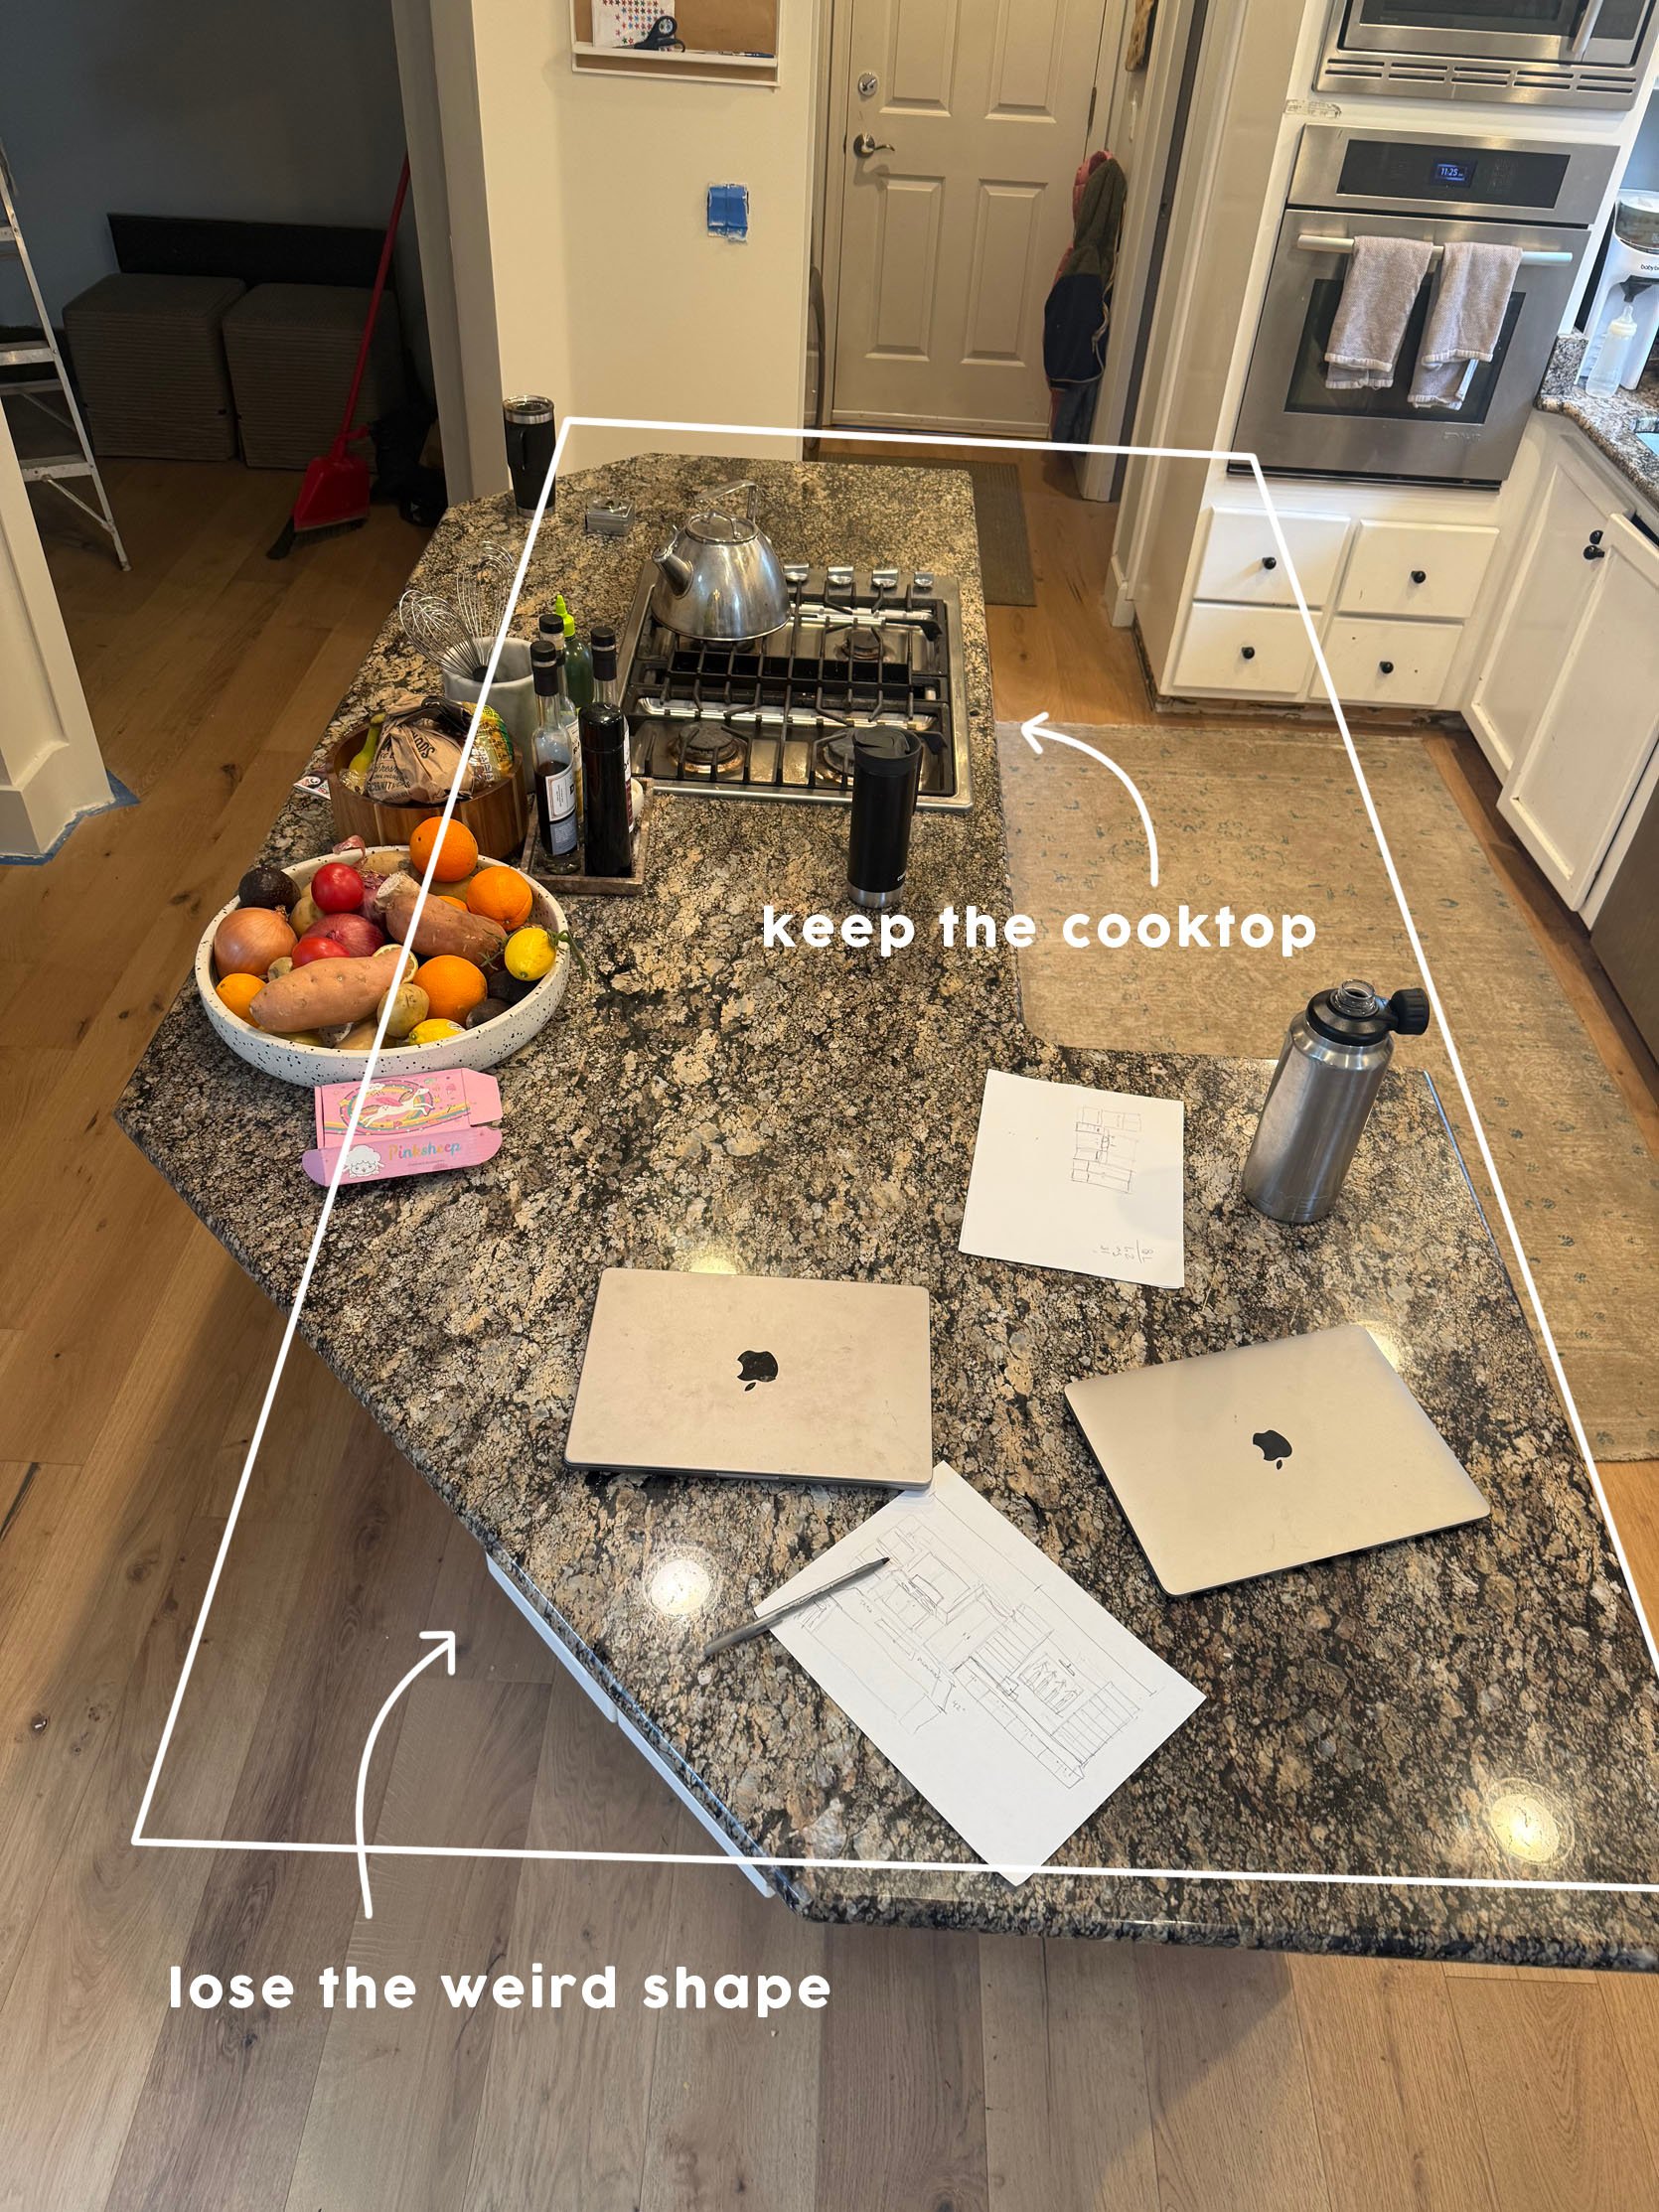
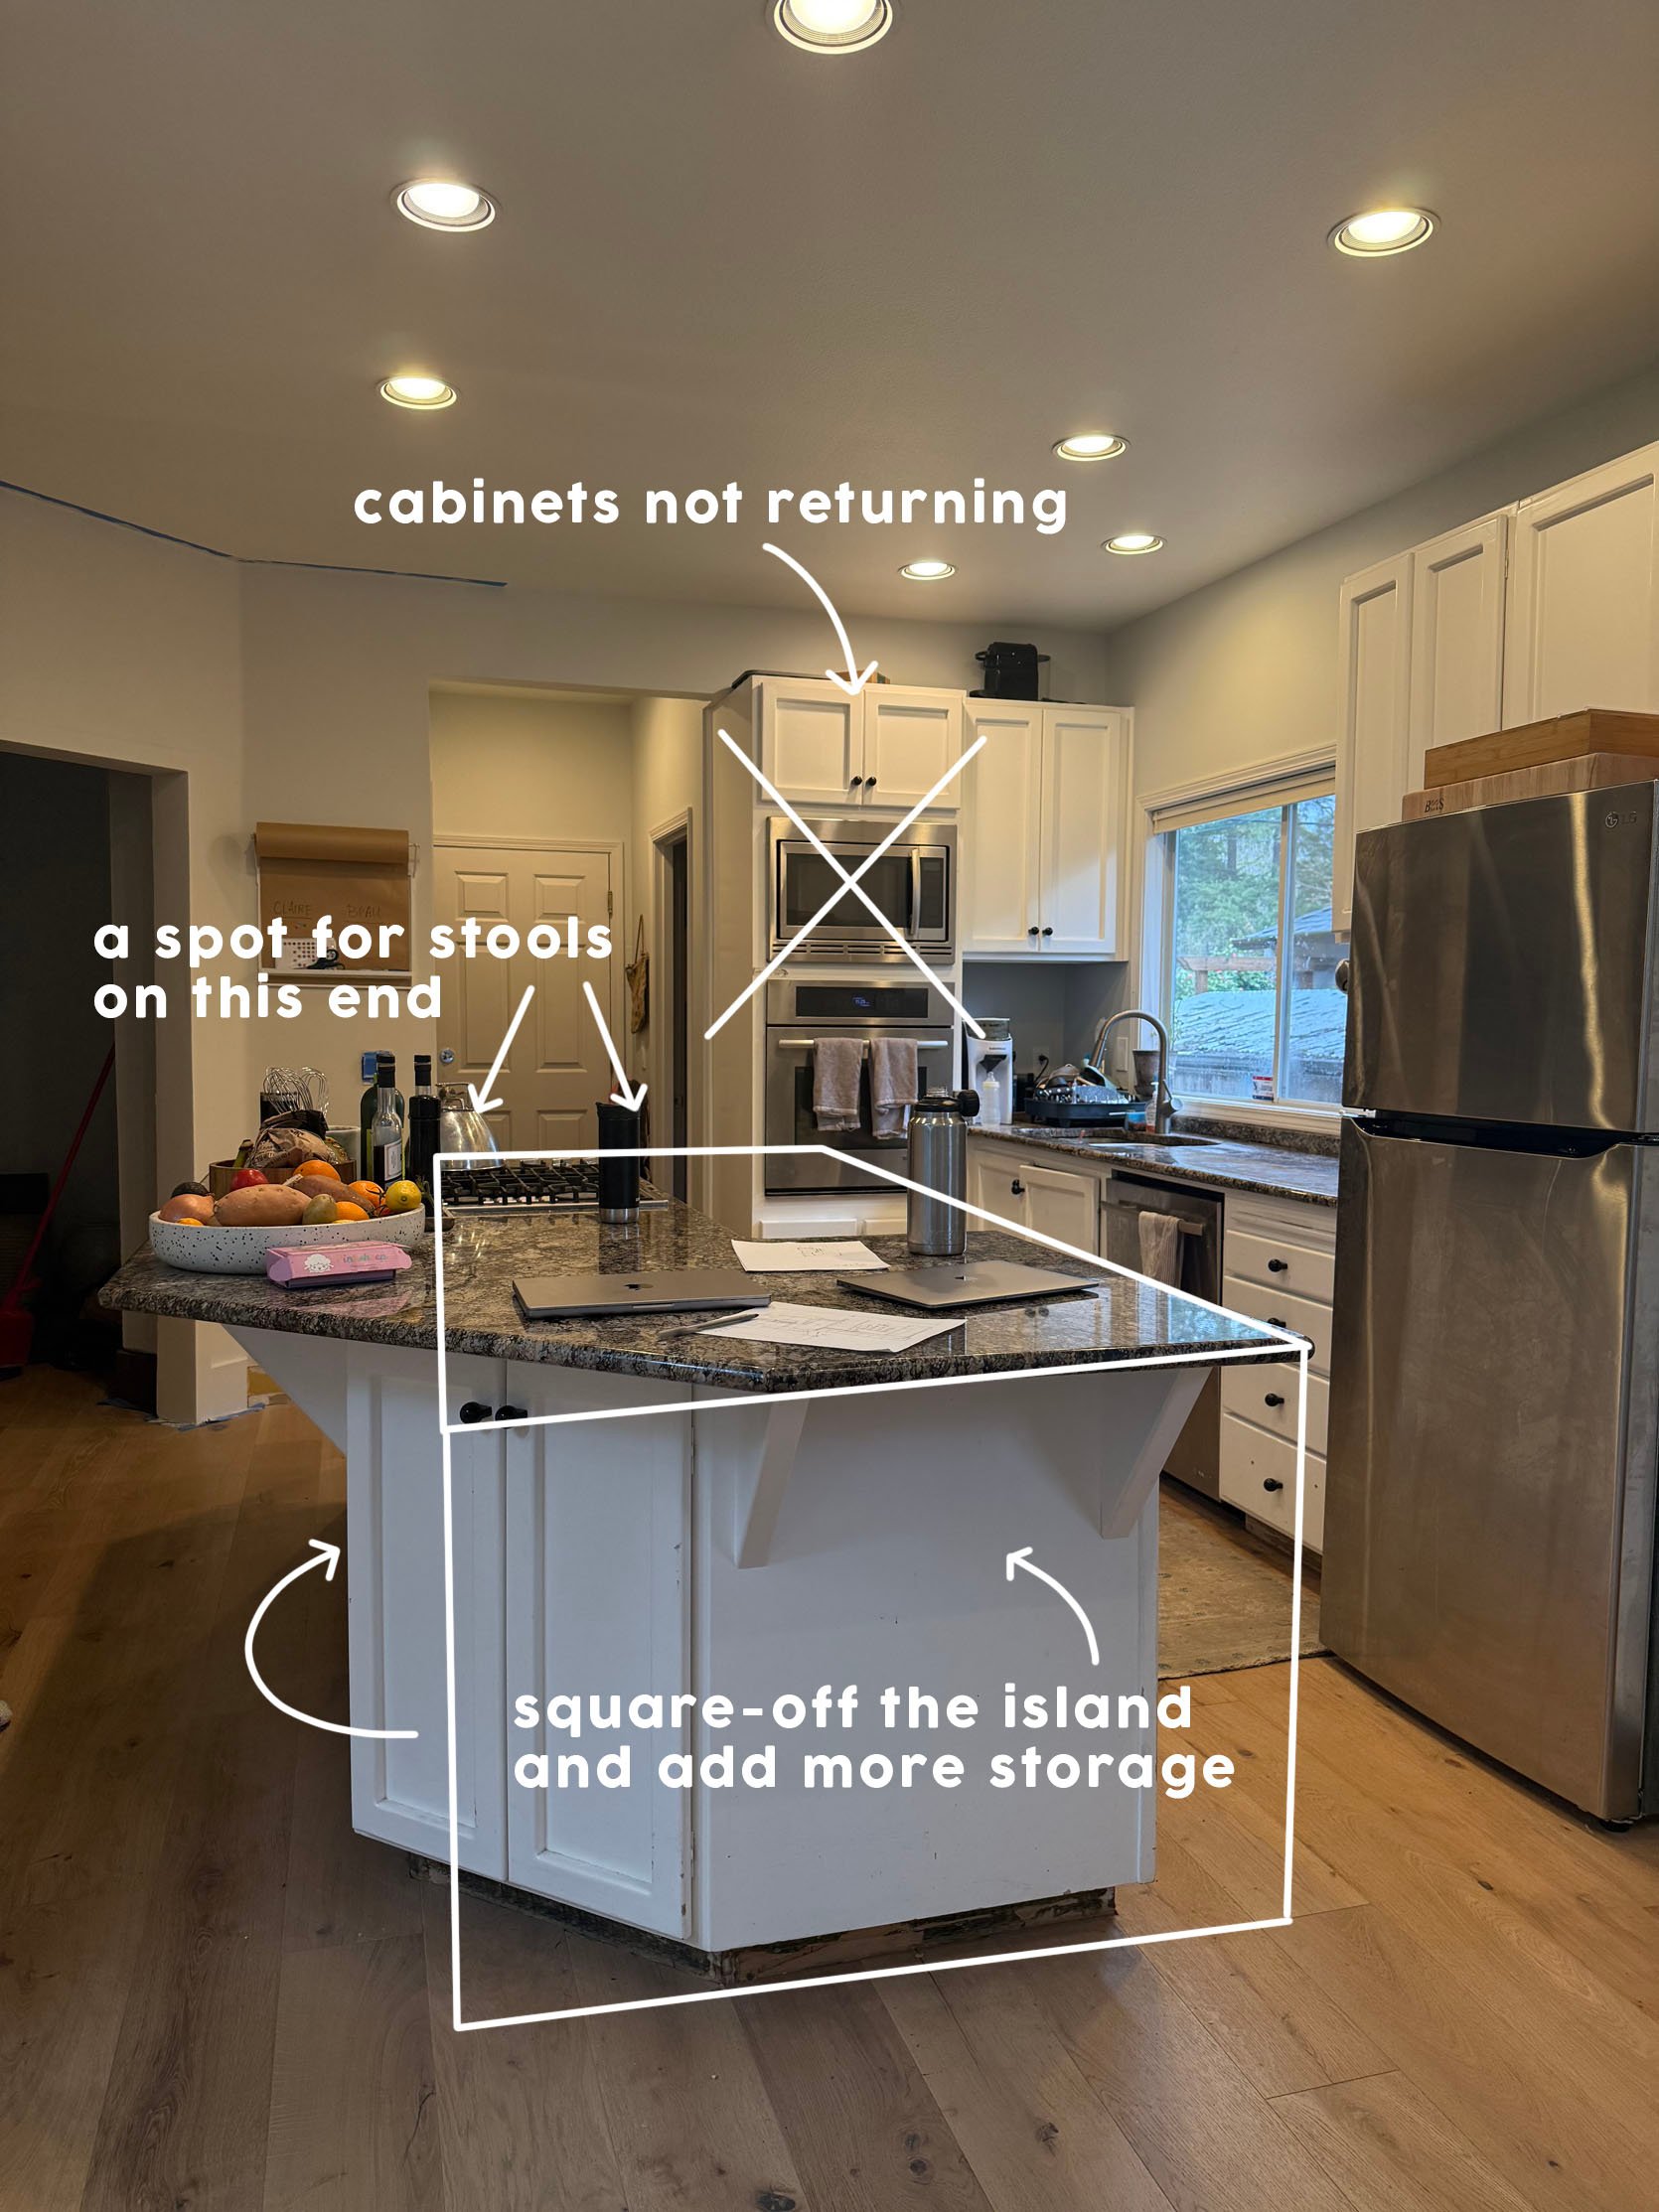
Another part of Chrissy’s design (and we are definitely aligned here) is to keep the island. Well, this funky island will not be staying, but a new rectangular island will take its place. Again, one of their big issues is having enough storage, so prioritizing extra cabinetry here makes sense. They talked about keeping the stools where they are currently, but Gretchen had the idea to build in the overhang at the end of the island instead, near the garage entrance. Enough room for the kiddos to have a seat on a couple of stools while dad cooks, and plenty of room to stand and gather around the back of the island when entertaining–which they do a lot of–while maximizing storage along the backside. The cooktop would stay here (though at one point in our meeting, we discussed swapping it with the sink but that would likely be too much of a ha$$le).
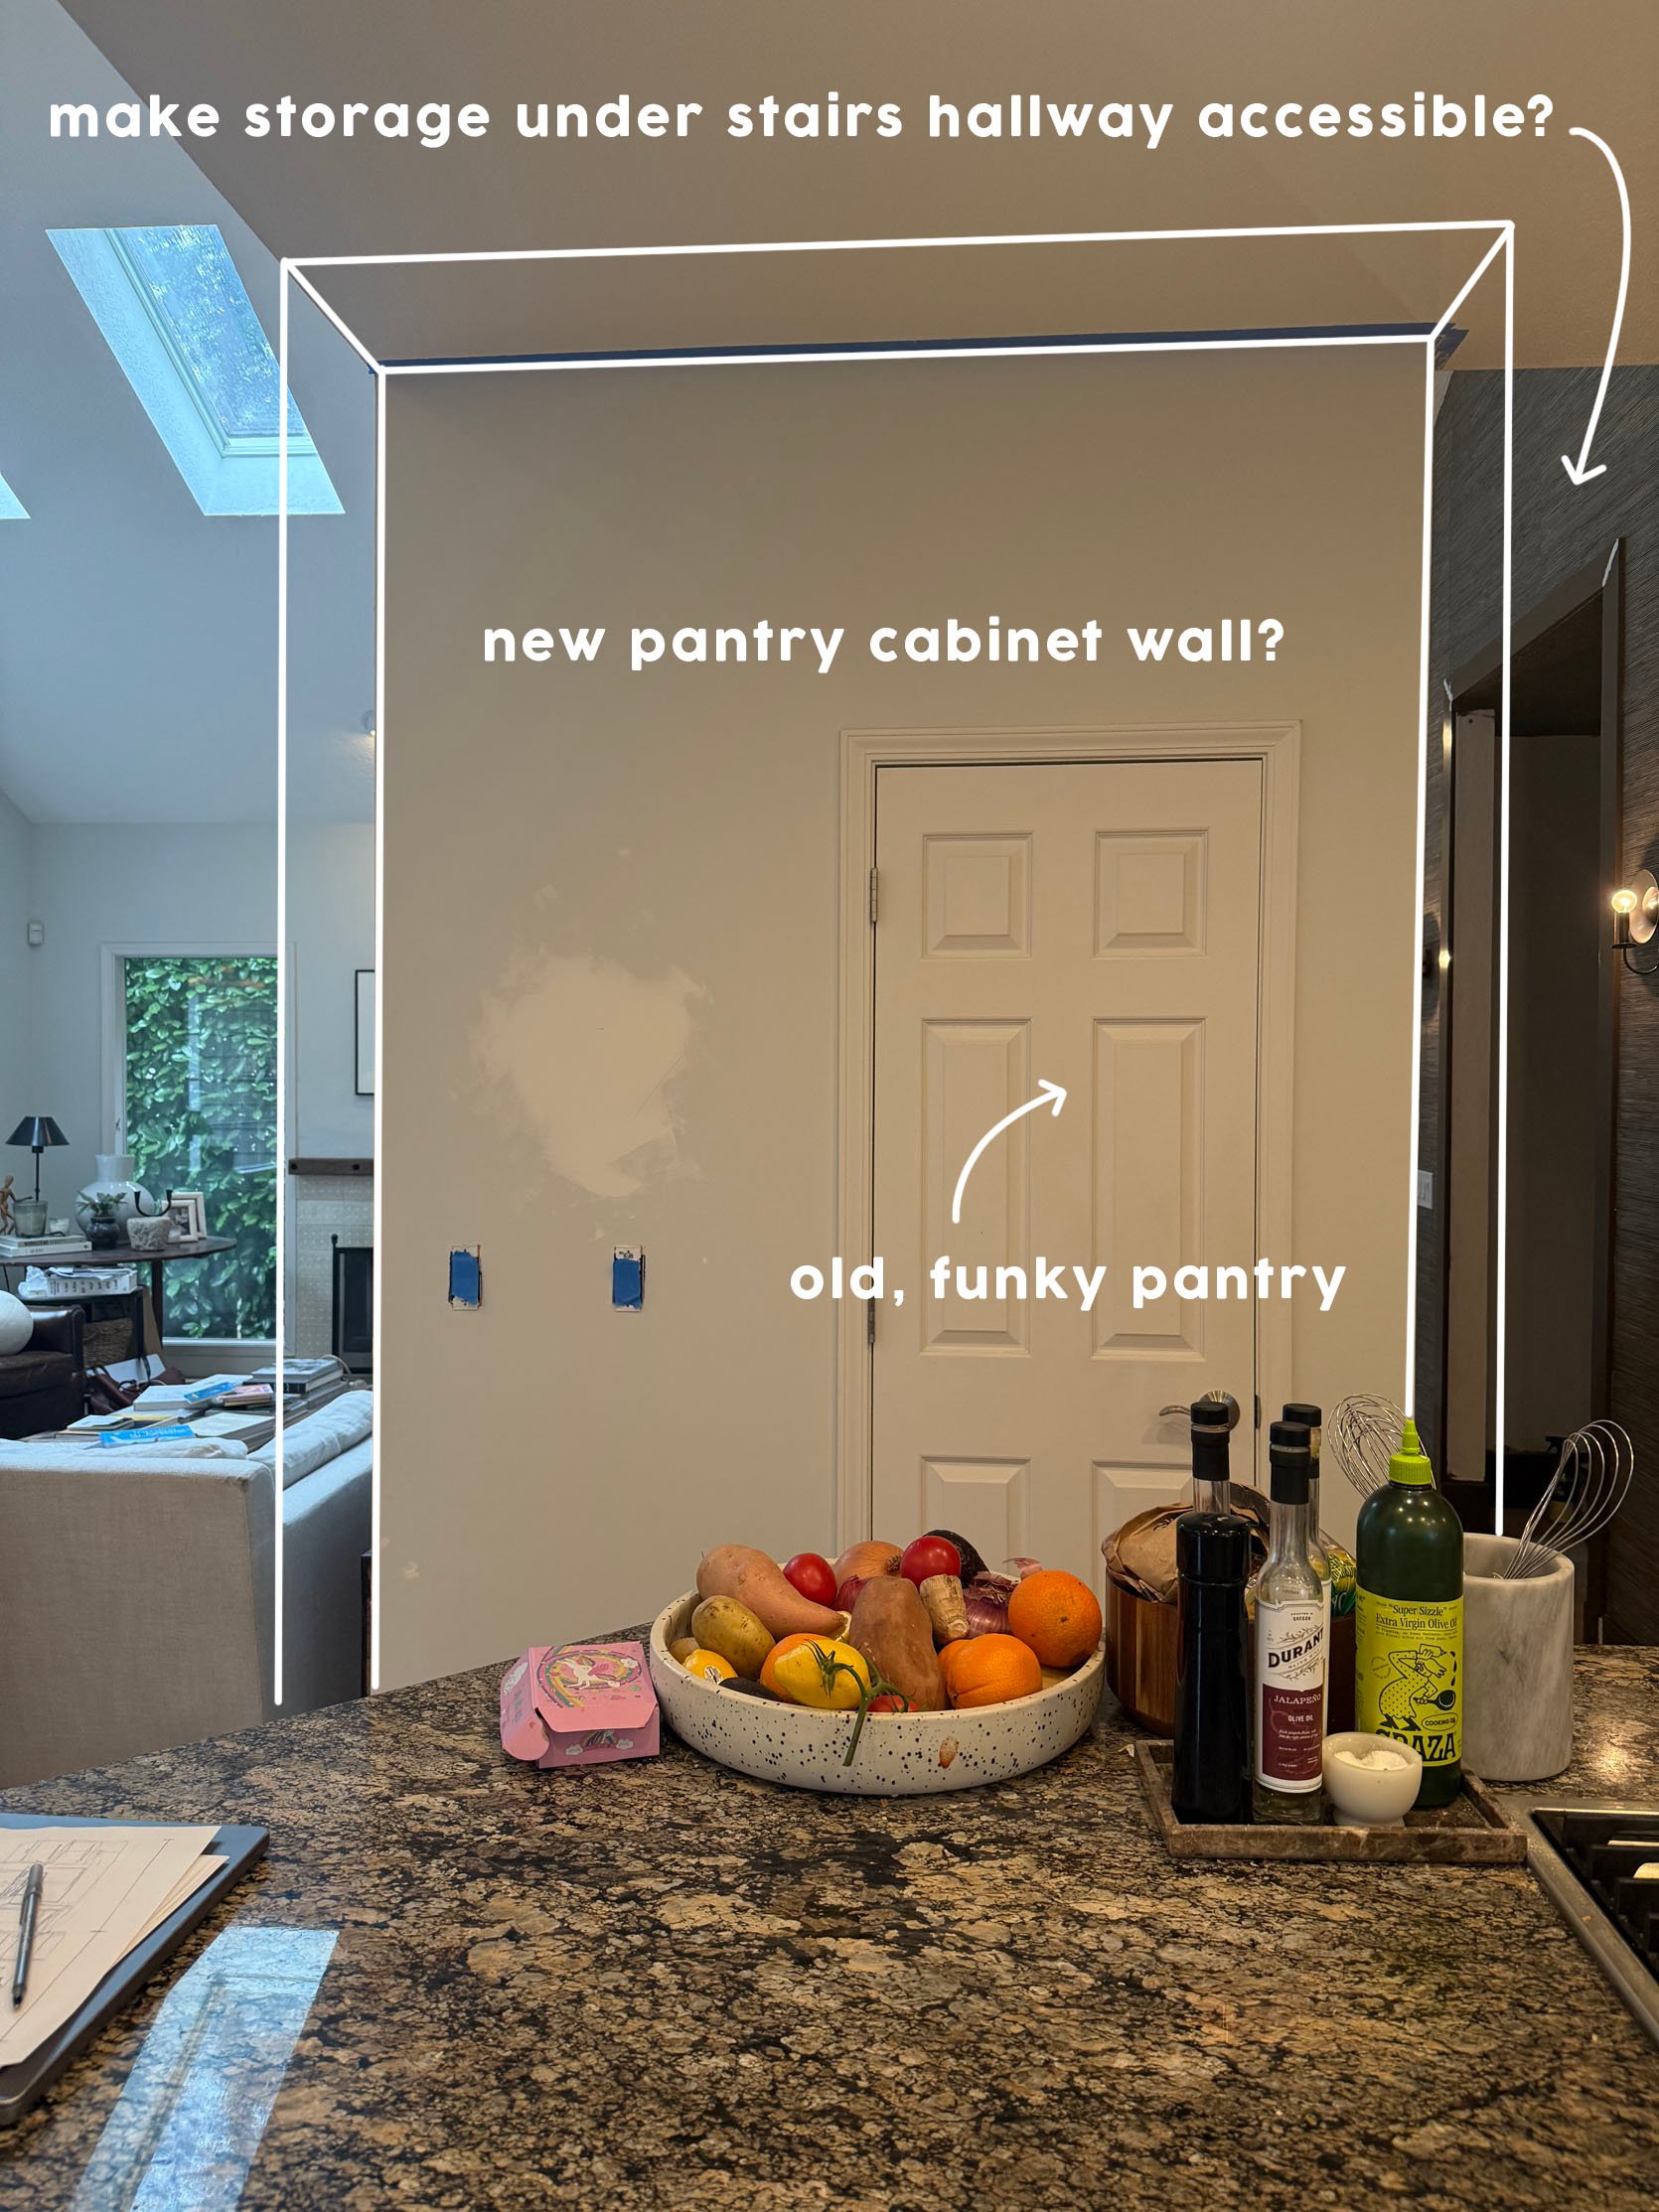
Behind the island is their “pantry”, in quotes because it’s more of a Harry Potter closet than a pantry, positioned in the void under the stairs. In all of Chrissy’s plans, integrating a new pantry cabinet was a staple of her design. If you scroll back up to her mockup, she originally envisioned it next to the paneled fridge, likely coming out past the 8ft ceiling divide. The problem then became making it look right with the vaulted ceiling. Would it come up past the 8ft and intersect with the vault? Or stay the same height? Does IKEA even make cabinets to fit a situation like this? And how would this all shake out measurement-wise?
Well, Gretch suggested instead turning the original stair/pantry wall into a grand wall of floor-to-ceiling-pantry cabinets, closing off the existing door, and moving its access to the side hallway with some clever angled doors or drawers. Both Chrissy and Peter perked up at this. Of course, it will all have to make sense dimensionally and could be impacted based on the size of the new island. And it means more projects. But it could be a very cool statement moment and would give the chef something more interesting to stare at than the current situation.
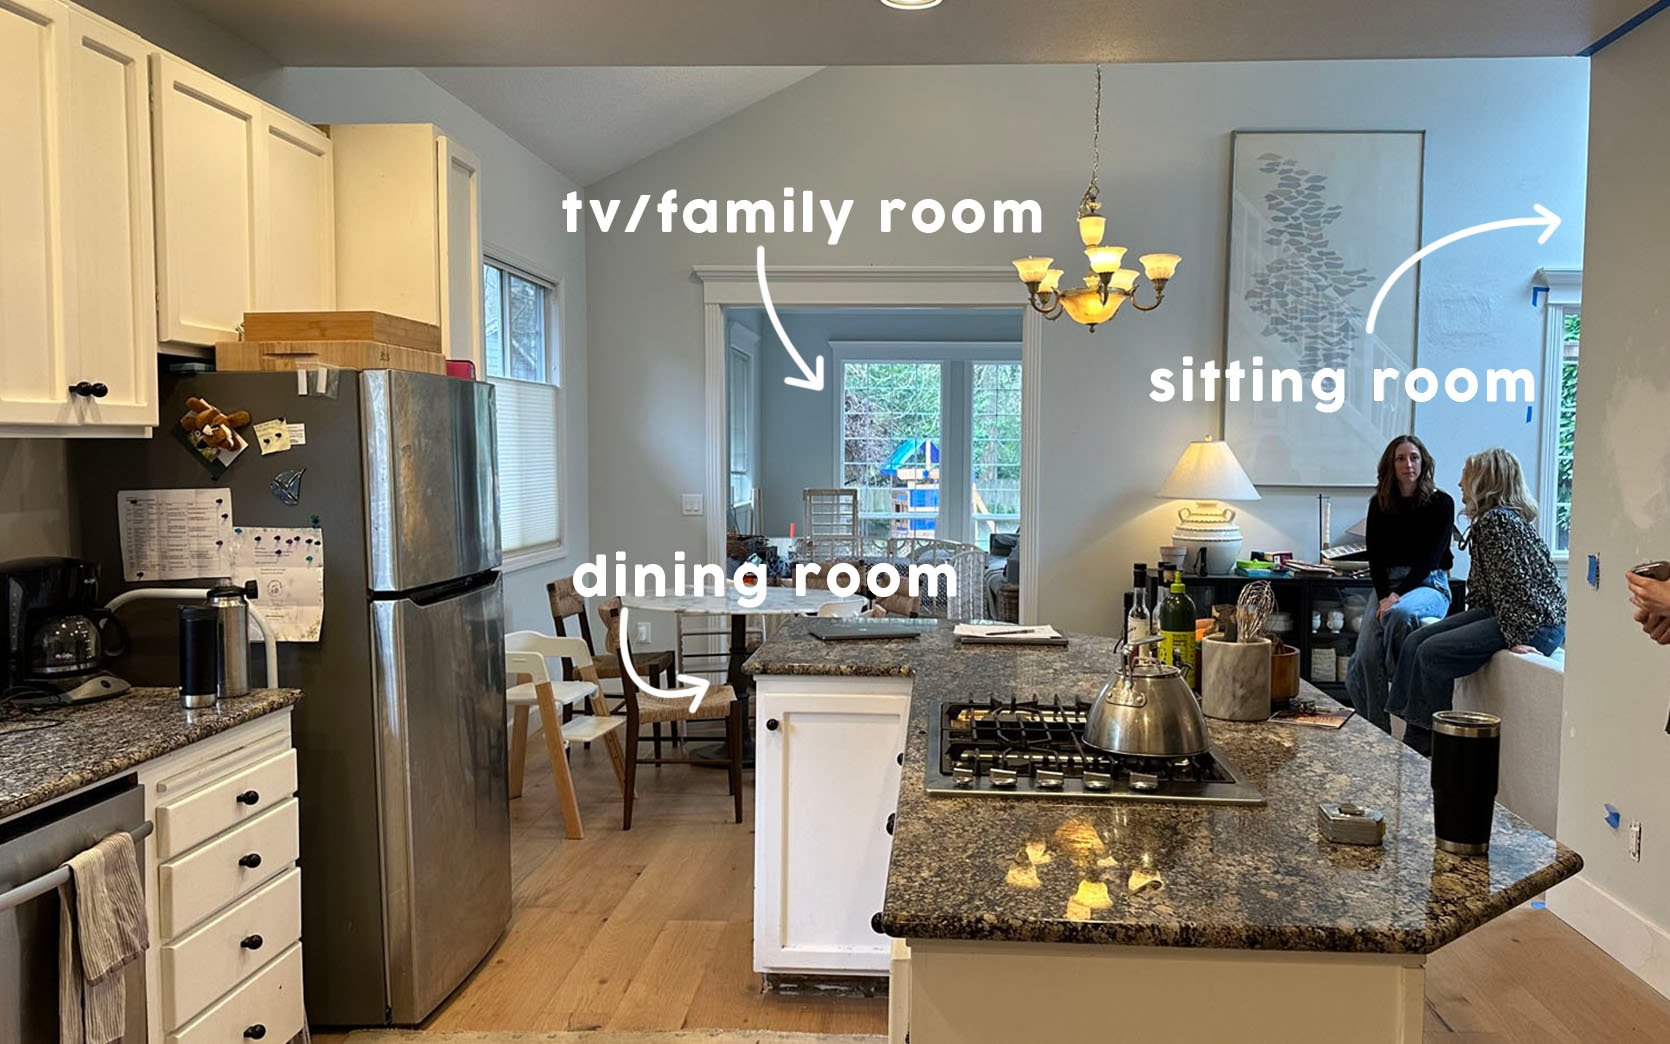
With more storage going in the island and the potential for a larger pantry area across it, the initial bar/cabinetry build-out into the living space now becomes less crucial. But the problem still remains. How do you integrate this living area with the kitchen so it feels cohesive and connected? Ending the cabinets in the same place as they are now might keep the kitchen feeling small. But extending it into a wet bar or just more counter space isn’t super functional if they also need this area to hold their dining table. Sure, it’d give them more storage but it’s unlikely they’d actually use it for prep space.
Our Solution?
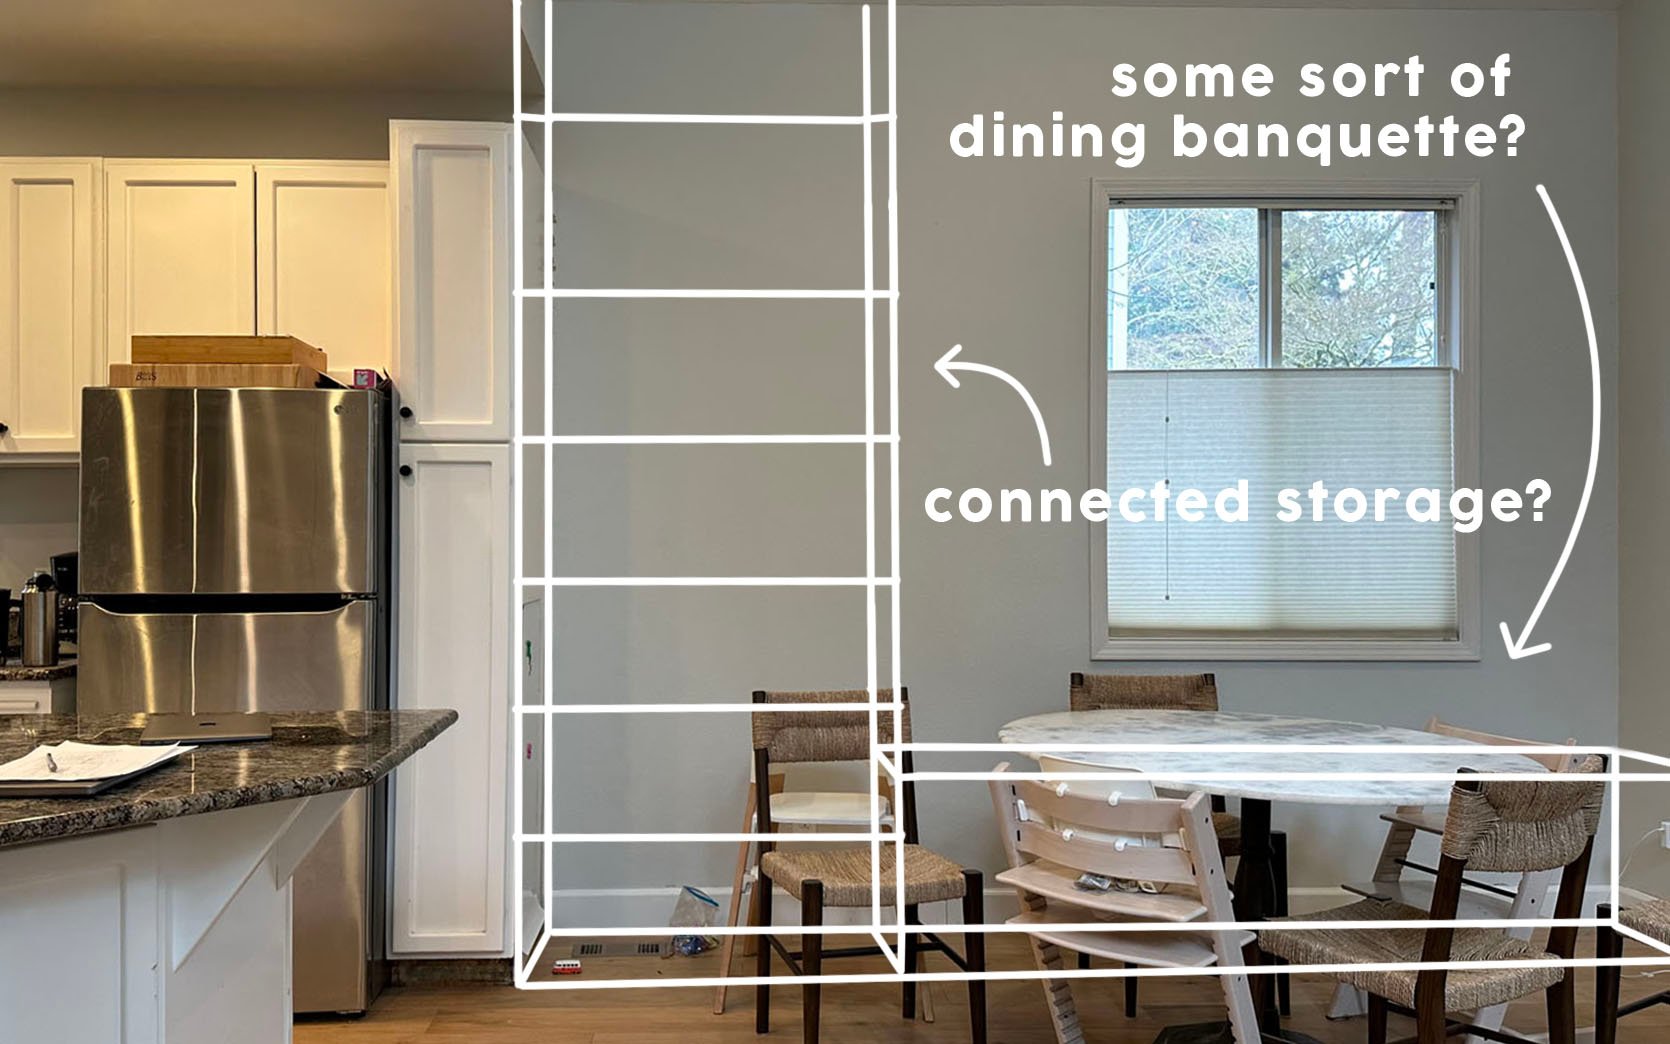
So what if instead, it became a built-in dining banquette, flanked with cabinets and shelving? This might feel more visually intentional than closed-off cabinets and could address the ceiling shift in a way that makes sense–to us at least. Remember, Chrissy is not married to this window staying here, so a new window could shift around or it could leave altogether and make room for a matching bookcase to flank either side of the bench (with the window in the middle?). The bench (and the shelves) would provide even more storage, but could also turn this wall into a really beautiful, thoughtful focal point.
So that’s where we left them, with plenty of new ideas and potential solutions swirling. The biggest question now is how does this all fit together?? Does that wall really have the right length for a double oven, sink, trash drawer and dishwasher, drawers, panel-ready fridge, open shelving bookcase (that starts at exactly the right spot with the weird ceiling shift), plus a built-in dining bench? How big should the island be? Can a grand pantry wall fit into the mix?
Their Homework
We were so excited about the layout change, but Chrissy really needed to figure out math-wise if they could fit their appliances AND the cabinets in the same kitchen footprint, utilizing the island for the cooktop and knowing that we’d have more storage in the new pantry and the floor-to-ceiling library cabinet focal moment in the dining room. We can’t really do much until we know that the layout will work within the footprint (we all feel hopeful).
They have to do some homework to get all of those answers, so we’ll check back in with them soon. I also tasked them with taking an inventory of their kitchen things, what all they’ll need to store, and mapping it out based on the new proposed design — a practice we swear by! Maybe they’ll find they don’t have so much of a storage issue after all?
As I was writing this I realized that this is a LOT to try to understand without you being in the space. If you’ve made it this far you are as invested as we are. With 3 kids under three years old, attempting a kitchen remodel is a doozy (thus me wanting to help). They think they can get it done in under 3 months and I’m loving their enthusiasm. They aren’t hiring a GC and instead are going to hire subcontractors and manage the project themselves, which honestly I think will make it go faster if they are on top of it and certainly could save them some money. They have already started getting bids and making relationships with subs and honestly, we all know that no one can get shit done faster than a mom, so maybe the 3 kids under 3 years will actually prove to be the motivation to drive fast. Regardless, we are along for this ride and hoping to not just be a backseat driver. Next up is seeing the update on the layout with our new plan and then we’ll go shopping for tile and stone (assuming that we are good to use the IKEA kitchen).
Since this is the first time we are documenting someone else’s project (and not doing renderings, etc) let us know if you have suggestions on the rollout of this – it’s a lot of information to get so we’ll try to break it down so you can weigh in and also gleam any help for your own project. A huge thanks to Chrissy and Peter for being our guinea pigs:)
View the original article and our Inspiration here
Leave a Reply